- A+
引言
本篇文章主要介绍的是关于CSS Sandbox的一些事情,为什么要介绍这个呢?在我们日常的开发中,样式问题其实一直是一个比较耗时的事情,一方面我们根据 UI 稿不断的去调整,另一方面随着项目越来越大可能哪一次开发就发现——诶,我的样式怎么不起作用了,亦或是怎么被另一个样式所覆盖了。原因可能有很多:
- 不规范的命名导致重复
- 为了简单,直接添加全局样式的修改
- 样式的不合理复用
- 多个项目合并时,每个子项目都有自己的独立样式和配置,可能在自己项目中不存在这样的问题,但是合并以后互相影响造成了样式污染
- 第三方框架引入
- ……
而CSS Sandbox正式为了隔离样式,从而解决样式污染的问题
应用场景
通过上述我们了解了样式污染产生的原因,从中我们也可以总结一下哪些场景时我们需要使用CSS Sandbox进行样式隔离呢
- 微前端场景下的父子以及子子应用
- 大型项目以及复杂项目的样式冲突
- 第三方框架以及自定义主题样式的覆盖
- ……
常见的解决方案
既然说了这么多样式污染产生的原因和应用场景,那我们该如何解决他们呢,目前有以下几种解决方案,其实解决的核心还是不变的——使CSS选择器作用的Dom元素唯一
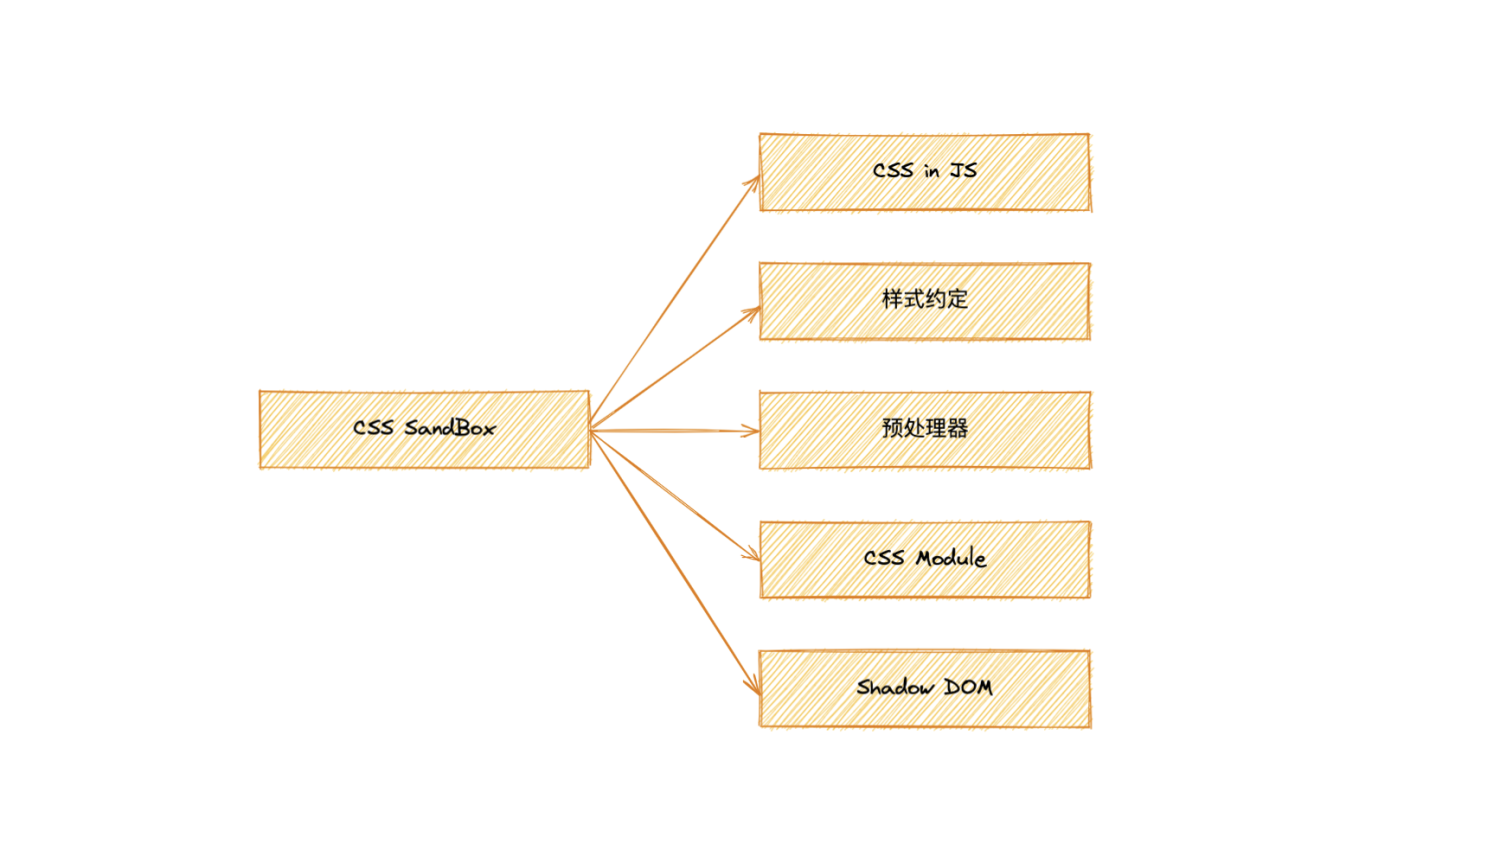
Tips:当我们在实际的开发中可以根据项目的实际情况进行选择
CSS in JS
看名字是不是感觉很高级,直译下就是用 JS 去写 CSS 样式,而不是写在单独的样式文件里。例如:
<p style='color:red'>css in js</p> 这和我们传统的开发思想很不一样,传统的开发原则是关注点分离,就比如我们常说的不写行内样式、行内脚本,即 HTML、JS、CSS 都写在对应的文件里。
关于 CSS in JS 不是一个新兴的技术,他的热度主要出现于一些 Web 框架的发展,比如说:React,它所支持的 jsx 语法,可以让我们在一个文件中同时写 js、html 和 css,并且组件内部管理自己的样式、逻辑,组件化开发的思想深入人心。
const style = { color: 'red' } ReactDOM.render( <p style={style}> css in js </h1>, document.getElementById('main') ); 每个组件的样式由自身的 style 决定,不依赖也不影响外部,从这一点来看确实实现了样式隔离的效果。
关于Css in js的库也有很多,比如说:
- styled-components
- polished
- ······
其中 styled-components 会动态生成一个选择器
import styled from 'styled-components' function App() { const Title = styled.h1` font-size: 1.5em; text-align: center; color: palevioletred; `; return ( <div> <Title>Hello World, this is my first styled component!</Title> </div> ); } 优缺点
| 优点 | • 没有作用域的样式污染问题(主要指的是通过写内行样式以及生成唯一的 CSS 选择器)
• 减少了无用样式的堆积,删除组件即删除对应的样式
• 通过导出定义的样式变量方便进行复用和重构 |
| --- | --- |
| 缺点 | • 内联样式不支持伪类和选择器等写法
• 代码的可读性比较差,违背了关注点分离的原则
• 运行时会消耗性能,动态生成 CSS(我们在写 CSS 时其实还是 js)
• 不能结合一些 CSS 预处理器,无法进行预编译 |
样式约定
通过约应用的命名前缀实现统一的开发和维护,比如说 BEM 的命名方式,通过对块、元素以及修饰符三者的命名来规范的描述一个组件
.dropdown-menu__item-button--disabled 优缺点
| 优点 | • 样式隔离
• 语义化强,组件可读性高 |
| --- | --- |
| 缺点 | • 命名太长
• 依赖于开发者的命名 |
预处理器
通过 CSS 预处理器可以处理很多独特的语法格式,比如:
- 可嵌套性
body { with: 20px; p { color: red; } } - 父选择器
body { with: 20px; &:hover { with: 30px; } } - 属性继承
.dev { width: 200px; } span { .dev } 通过这些特殊的语法让 CSS 更容易解读和维护
一些常见的市场上的预处理器
- Sass
- Less
- Stylus
- PostCss
优缺点
| 优点 | • 可读性较好,方便理解和维护 DOM 结构
• 利用嵌套等方式,也可以大幅度解决样式污染的问题 |
| --- | --- |
| 缺点 | •需要增加额外的包,借助相关编译工具 |
Tips:通常与类似于 BEM 的命名方式结合,可以达到提高开发效率,增强可读性以及复用的效果
CSS Module
顾名思义就是将 CSS 进行模块化处理,编译好后可以避免样式被污染的问题,不过依赖于Webpack需要配置css-loader等打包工具,以下是我在create-react-app创建的项目中运行,由于其已经在 webpack 配置了css-loader,因此在此篇文章中不展示具体配置
index.ts 文件
import style from './style.module.css' function App() { return ( <div> <p className={style.text}>Css Module</p> </div> ); } style.module.css 文件
.text { color: red; } // 等同于 :local(.text) { color: blue; } // 还有一种全局模式,此时不会进行编译 :global(.text) { color: blue; } 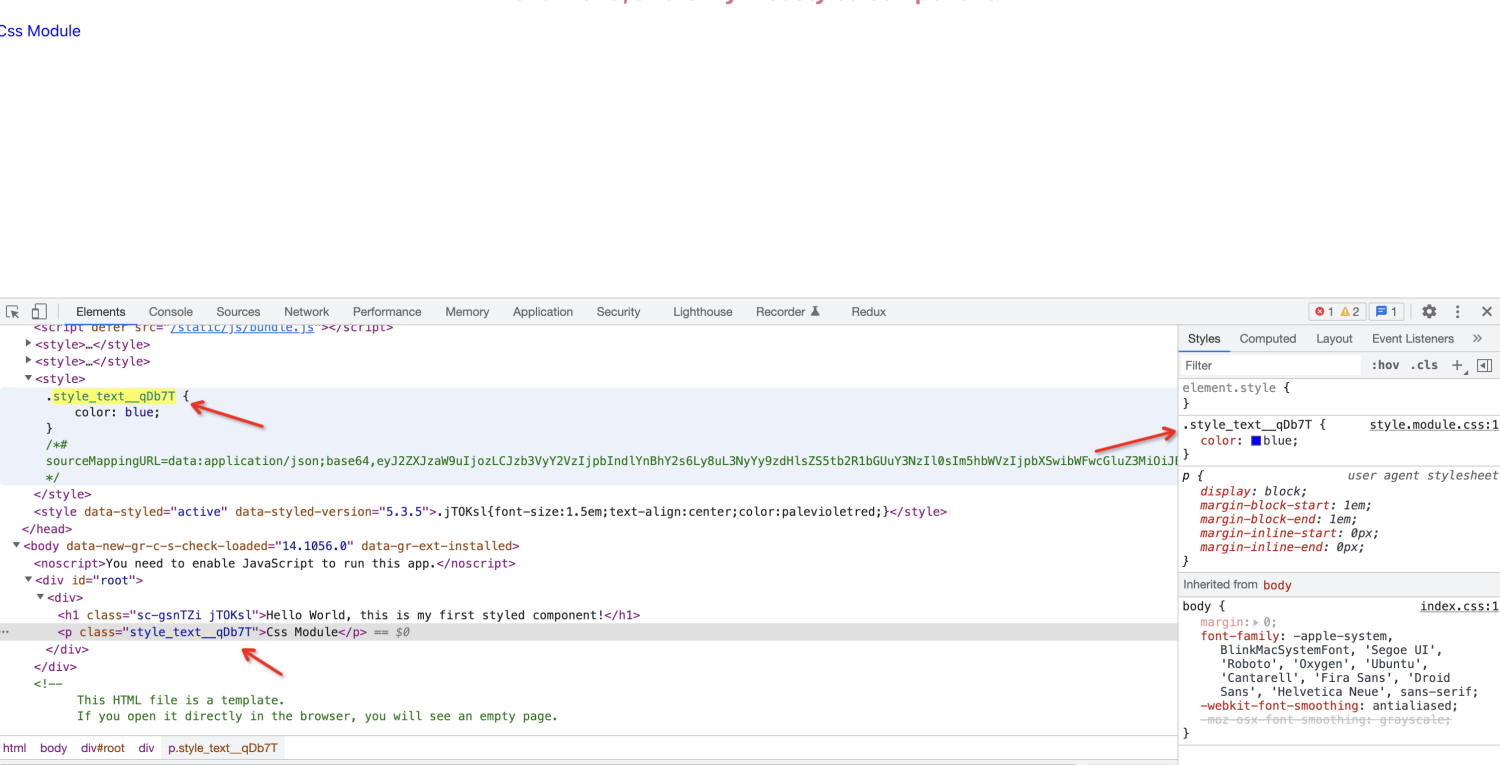
打包工具会同时把 style.text 以及 text 编译成独一无二的值
优缺点
| 优点 | • 学习成本较低,不依赖于人工约束
• 基本上能 100%解决样式污染问题
• 方便实现模块的复用 |
| --- | --- |
| 缺点 | • 只能在构建时使用,依赖于 css-loader 等
• 可读性差,在控制台调试时出现 hash 值不方便调试 |
Shadow DOM
它可以将一个隐藏且独立的 DOM 附加到一个元素上。当我们用 Shadow DOM 包裹一个元素后,其内样式不会对外部样式造成影响,外部样式也不会对其内部造成影响
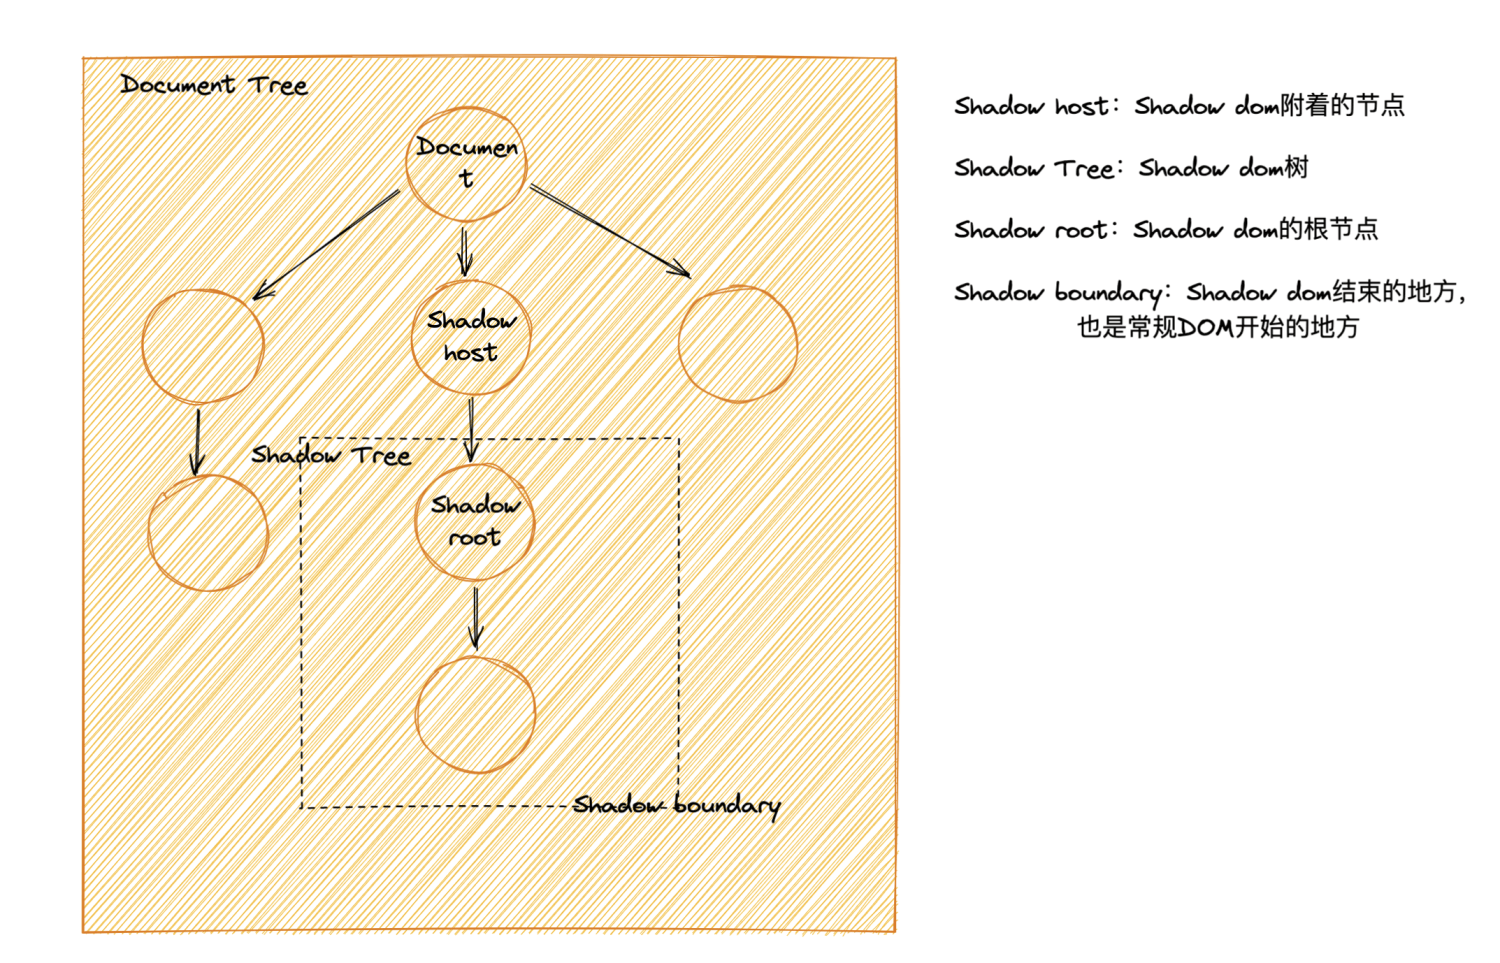
// 创建一个shadow dom,我这里是通过ref去拿附着的节点,一般可以用document去拿 import './App.css'; // 定义了shadow-text的样式 function App() { const divRef = useRef(null) useEffect(() => { if(divRef?.current) { const { current } = divRef const shadow = current.attachShadow({mode: 'open'}); // mode用来控制能否用js获取shaow dom内的元素 shadow.innerHTML = '<p className="shadow-text">Here is some new text</p>'; } }, []) return ( <div> <div ref={divRef} className='shadow-host'></div> </div> ); } 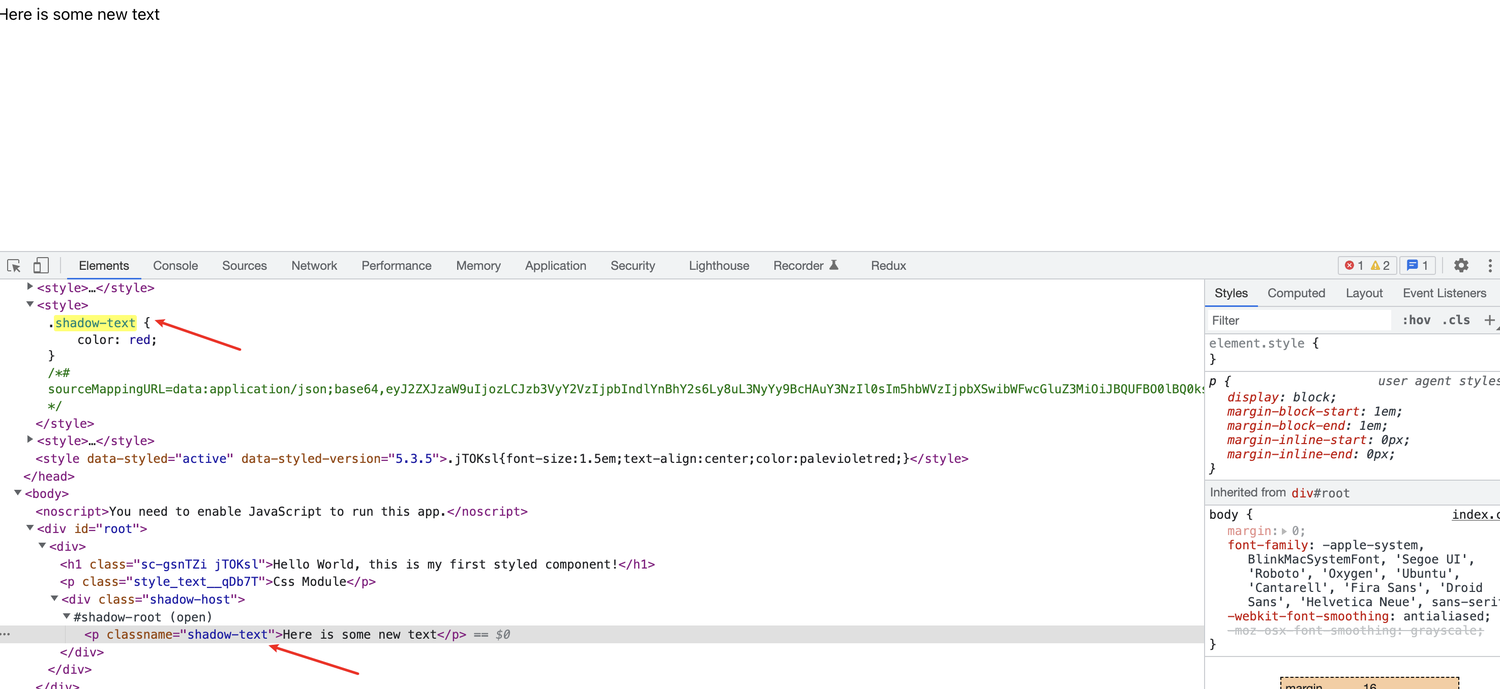
外部样式无法影响 shadow dom 内部的样式
我们再来看下 shadow dom 内部得样式会影响外部样式吗?
function App() { useEffect(() => { if(divRef?.current) { const { current } = divRef const shadow = current.attachShadow({mode: 'open'}); shadow.innerHTML = '<style>.shadow-h1 { color: red } </style><p class="shadow-h1">Here is some new text</p>'; } }, []) return ( <div> <Title>Hello World, this is my first styled component!</Title> <h1 className='shadow-h1'>lalla1</h1> <div ref={divRef} className='shadow-host'></div> </div> ); } 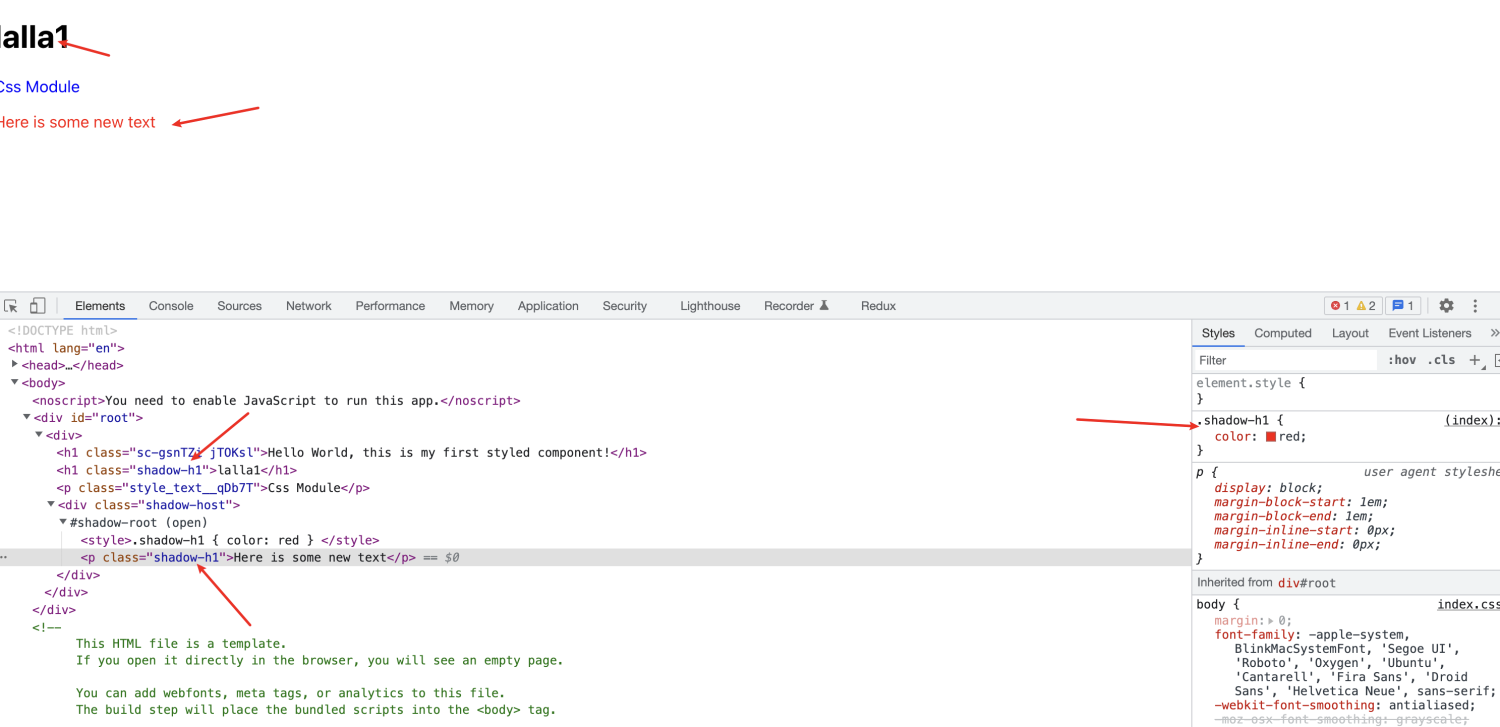
但是也有例外,除了[:focus-within](https://developer.mozilla.org/zh-CN/docs/Web/CSS/:focus-within)
import { useEffect, useRef } from 'react' import './App.css'; // .shadow-host:focus-within { background-color: yellow;} function ShadowExample() { const divRef = useRef(null) useEffect(() => { if(divRef?.current) { const { current } = divRef const shadow = current.attachShadow({mode: 'open'}); shadow.innerHTML = '<input class="shadow-h1"/>'; } }, []) return ( <div> <p>Css Module</p> <div ref={divRef} className='shadow-host'></div> </div> ); } export default ShadowExample; 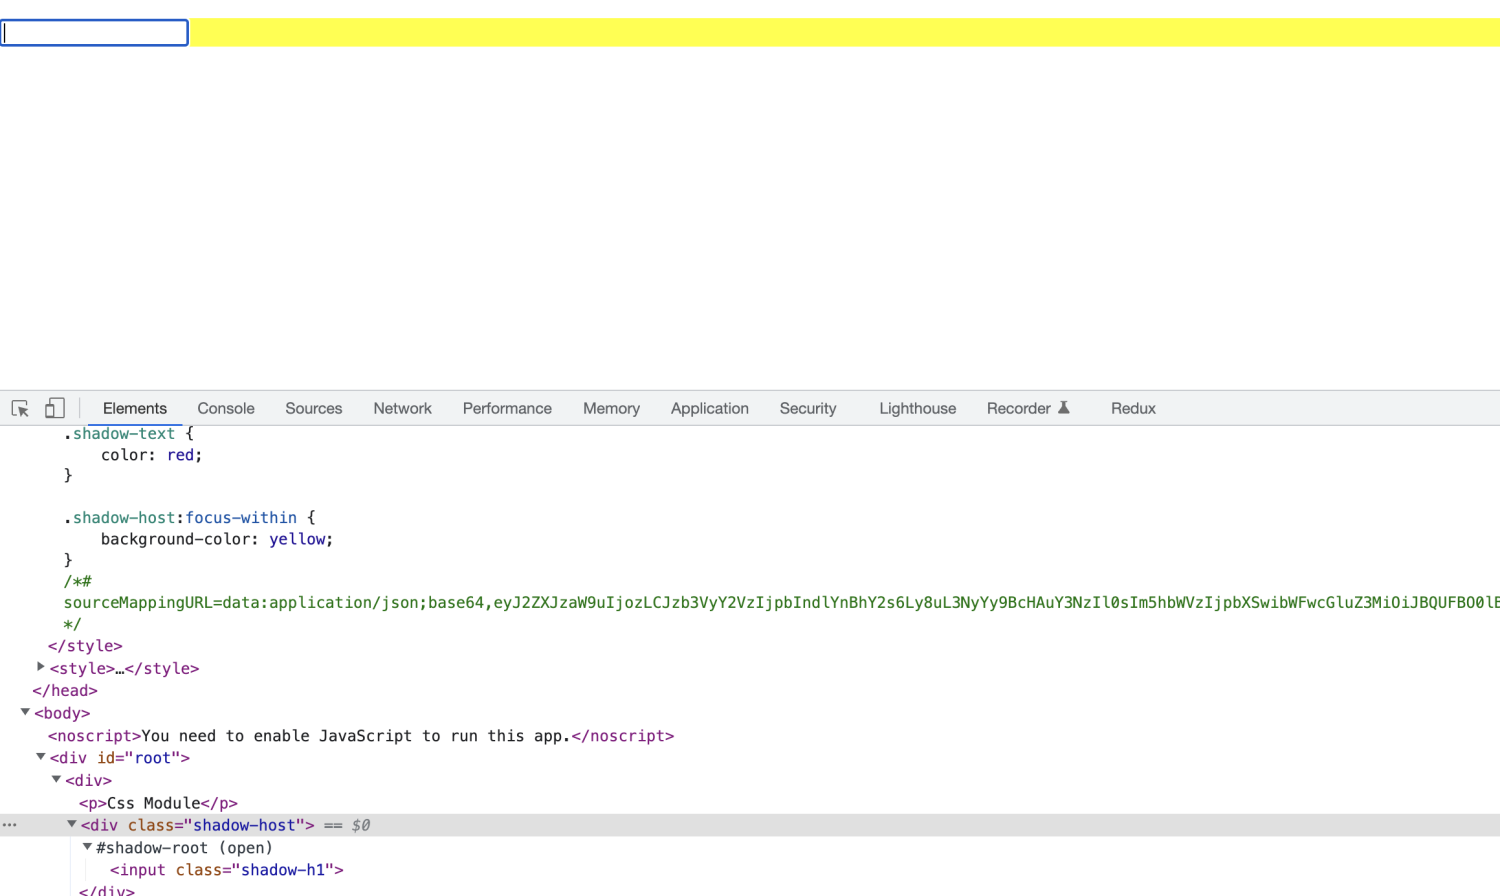
问题
正由于shadow dom内的样式只会应用于内部,如果我们在 shadow dom 内部用了类似于antd的Modal这些创建于document.body下的弹窗或者其他组件时,无法应用于antd的样式,需要把antd的样式放到上一层中。
优缺点
| 优点 | • 不需要引入额外的包,浏览器原生支持
• 严格隔离 |
| --- | --- |
| 缺点 | • 在某些场景下可能出现样式失效的问题,如上问题中的 shadow dom 内创建了全局的 Modal |
浅析 QianKun 中的 CSS SandBox
上面我们讲解了一些实现样式隔离的基本方案,那作为一个比较成熟的微前端框架QianKun中又是怎么实现样式隔离方案的呢,以下的源码解析是在v2.6.3的版本上研究的,首先通过看文档可以发现

在 QianKun 中 CSS SandBox 有两种模式:
strictStyleIsolation——严格沙箱模式experimentalStyleIsolation——实验性沙箱模式
strictStyleIsolation
需要注意的是该方案不是一个无脑的解决方案,开启后需要进行一定的适配
下面我们来详细介绍下该模式:
我们设置strictStyleIsolation为true时,QianKun采用的是Shadow DOM方案,核心就是为每个微应用包裹上一个 Shadow DOM 节点。接下来我们看下是怎么实现的
先来个流程图我们有个大致的概念:
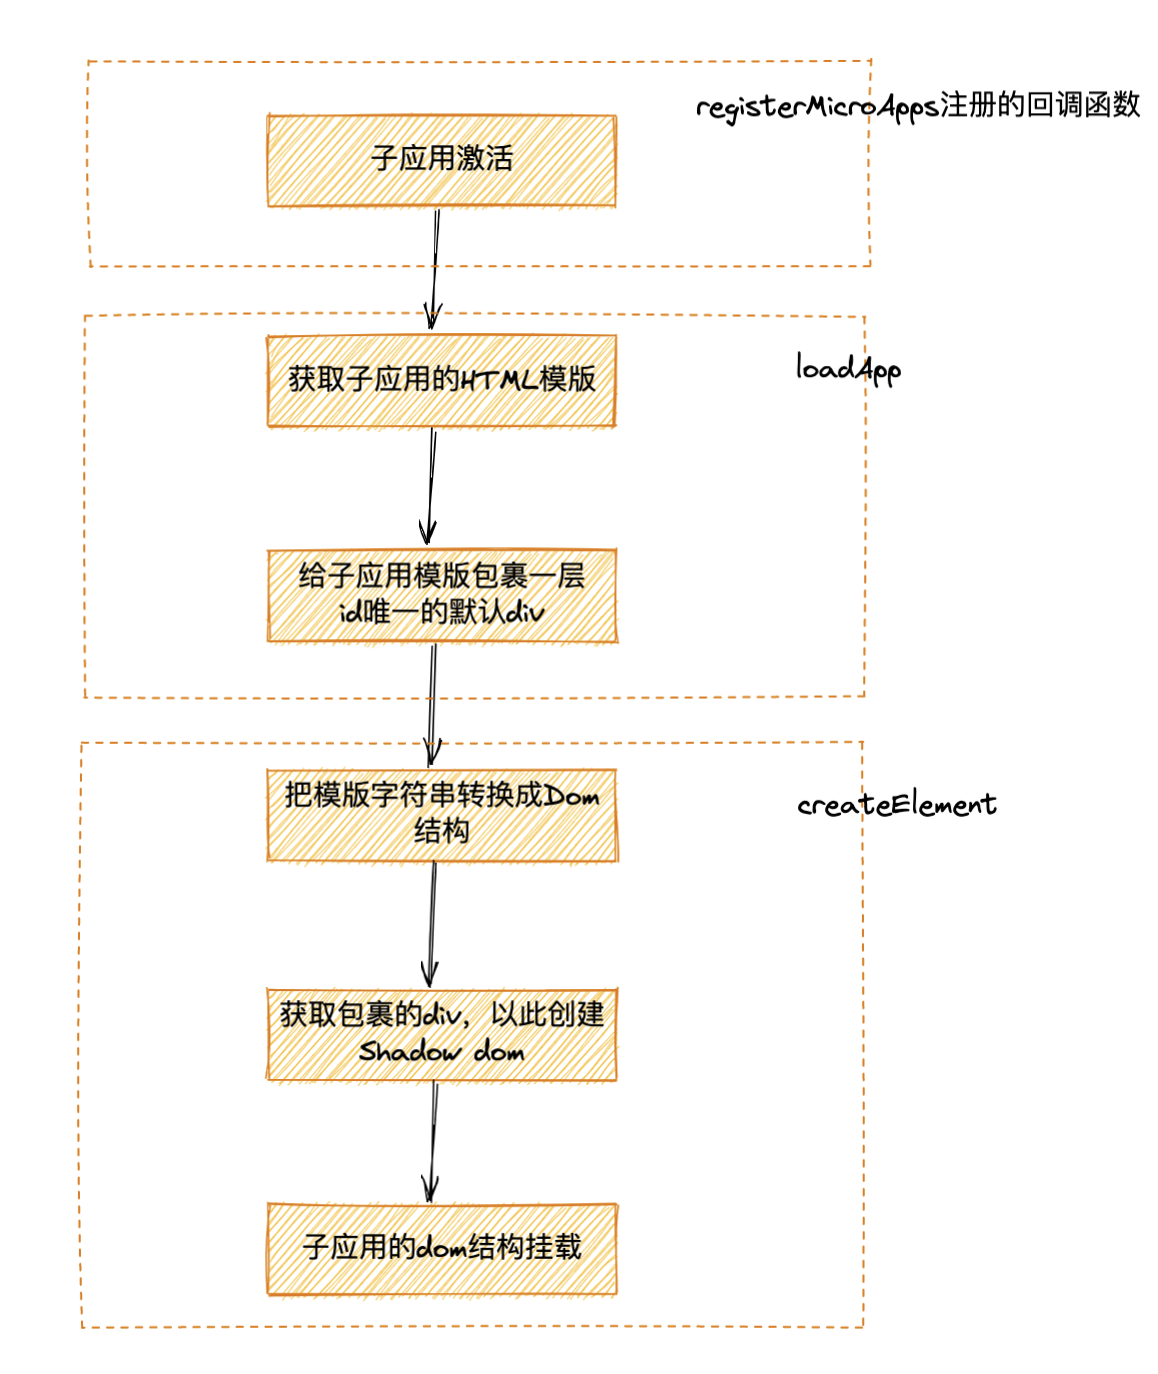
**registerMicroApps**:注册子应用,同时调用 single-spa 中的registerApplication进行注册**loadApp**:加载子应用,初始化加载子应用的 Dom 结构,创建样式沙箱和 JS 沙箱等,同时返回不同阶段的生命周期**createElement**:样式沙箱的具体实现,主要分为两种strictStyleIsolation和experimentalStyleIsolation
registerMicroApps:注册子应用
export function registerMicroApps<T extends ObjectType>(apps: Array<RegistrableApp<T>>,lifeCycles?: FrameworkLifeCycles<T>,) { ... registerApplication({ name, app: async () => { ... // 加载微应用的具体方法,暴露bootstrap、mount、unmount等生命周期以及一些其他配置信息 const { mount, ...otherMicroAppConfigs } = ( await loadApp({ name, props, ...appConfig }, frameworkConfiguration, lifeCycles) )(); ... }, // 子应用的激活条件 activeWhen: activeRule ... }); }); } 调用 single-spa 的 registerApplication 对应用进行注册,并且在应用激活的时候调用 app 的回调,其中最主要的是loadApp加载微应用的具体方法
一些参数的说明:
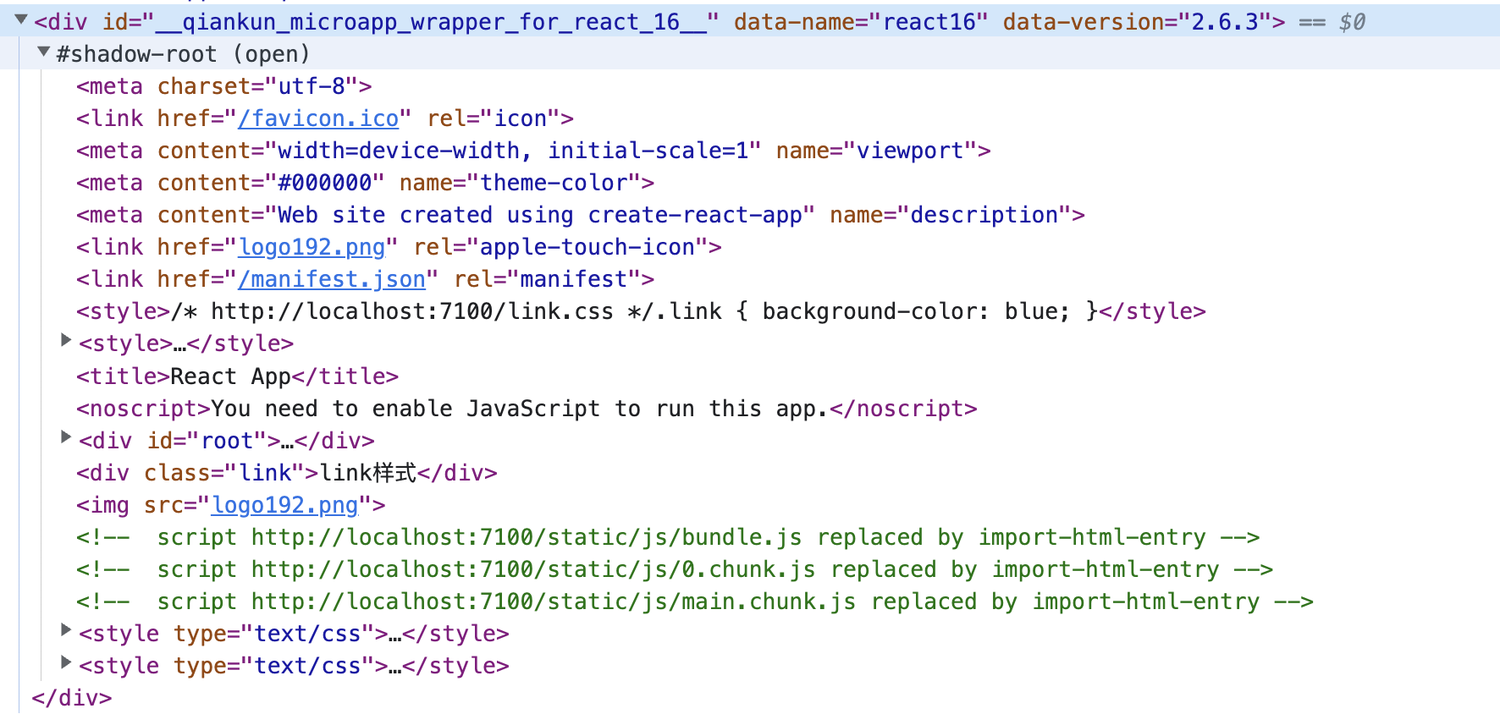
apps:微应用的注册信息
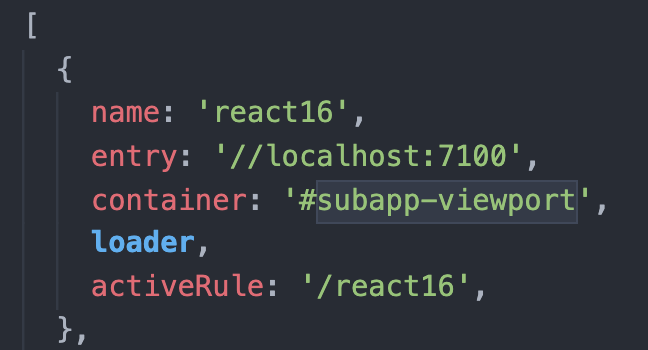
lifeCycles:微应用的一些生命周期钩子
loadApp:加载子应用
function loadApp (app: LoadableApp<T>, configuration: FrameworkConfiguration = {},lifeCycles?: FrameworkLifeCycles<T>) { ... /** * 将操作权交给主应用控制,返回结果涉及CSS SandBox和JS SandBox * template --template的为link替换为style注释script的HTML模版 * execScripts --脚本执行器,让指定的脚本(scripts)在规定的上下文环境中执行,只做了解暂时不讲 * assetPublicPath -- 静态资源地址,只做了解暂时不讲 */ const { template, execScripts, assetPublicPath } = await importEntry(entry, importEntryOpts); // 给子应用包裹一层div后的子应用html模版, 是模版字符串的形式 const appContent = getDefaultTplWrapper(appInstanceId)(template); let initialAppWrapperElement: HTMLElement | null = createElement( appContent, // 是否开启了严格模式 strictStyleIsolation, // 是否开启实验性的样式隔离 scopedCSS, // 根据应用名生成的唯一值,唯一则为appName,不唯一则为appName_[count]为具体数量,重复会count++ appInstanceId, ); ... // 下面还有一些生命周期的处理方法 } Q1:到现在不知道还有没有人记得我们开启严格样式模式是需要做啥?
!!!把子应用的 Dom 结构放到 Shadow dom 中与主应用隔离,防止样式污染
Q2:那我们咋拿到子应用的 Dom 结构呢?
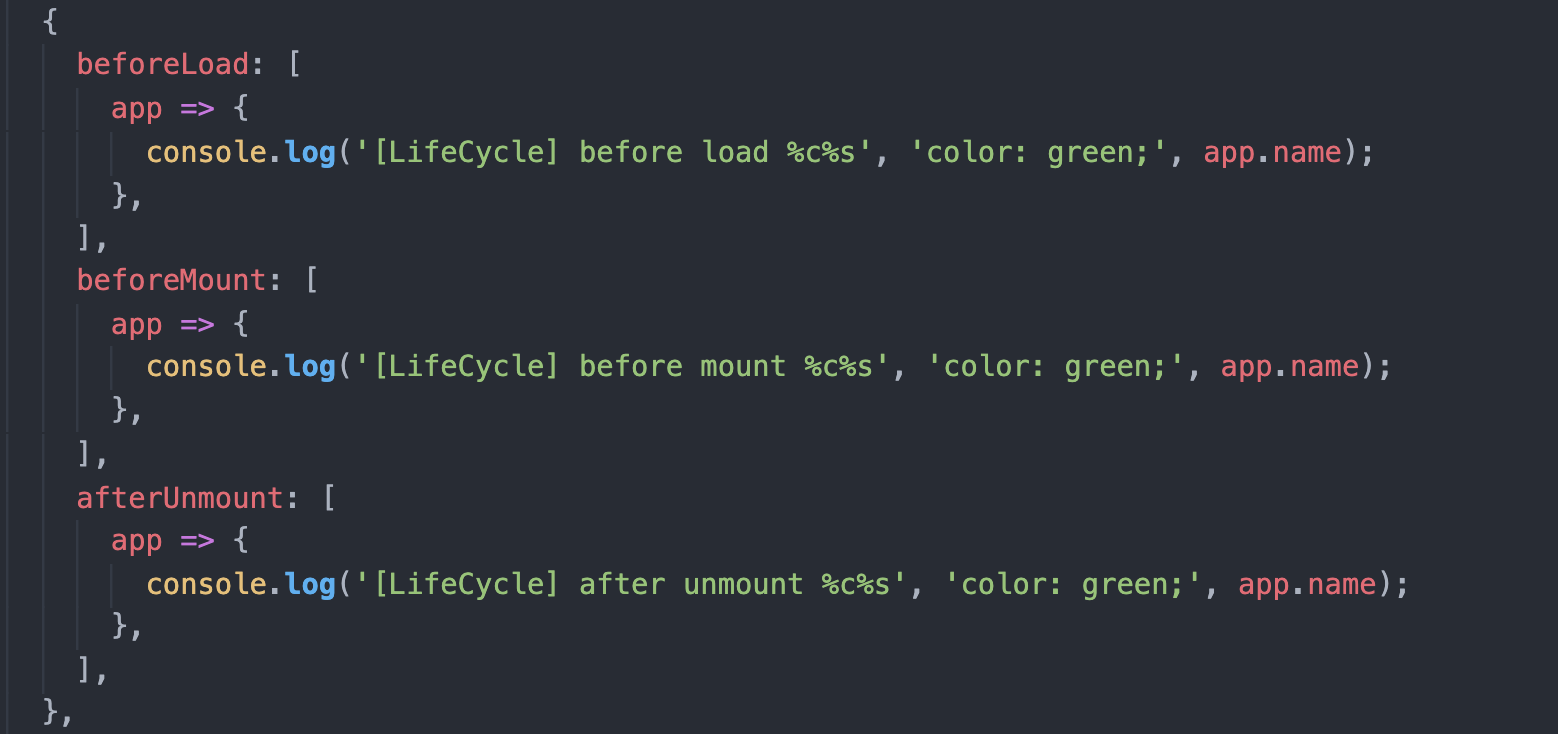
没错就是通过import-html-entry库的import-html-entry方法,有兴趣给看下关于import-html-entry 解析
没错我们拿到了template、execScripts和assetPublicPath,这里我们不对后两个进行讲解,聚焦到template上:
对比下子应用原来的 HTML 结构
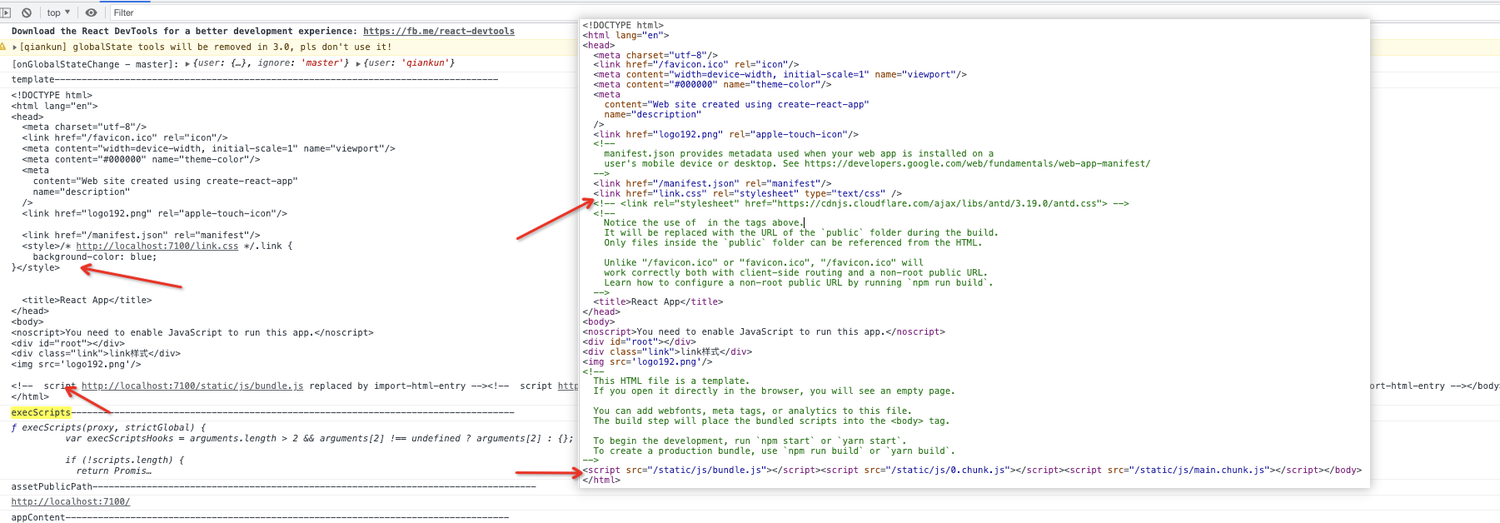
可以发现我们拿到的template是link标签变成style标签注释了script的 HTML 模版,其中就有我们需要的子应用的 Dom 结构。
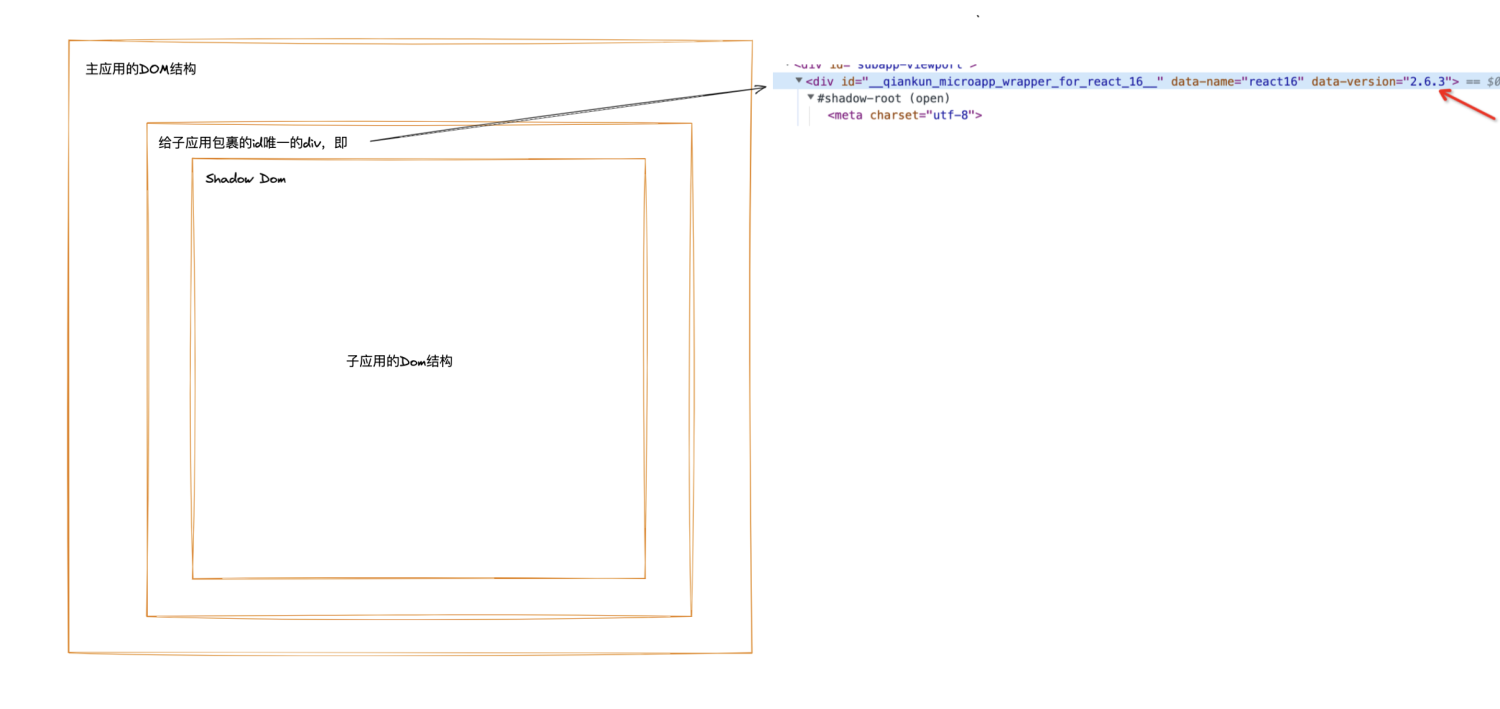
拿到以后 QianKun 里又在template上包裹了一层 Div 形成一个新的 HTML 结构的模版字符串,这是为什么呢?主要是为了在主应用中标识该节点下的内容为子应用,当然在后面我们也需要它进行特别的处理,这个后面讲到的时候再说。因此我们现在拿到的appContent长成这个样子:

这个 div 的 id 是唯一的哈!!!
那我们现在是不是已经做好了前期准备,现在我们需要进入最后一个步骤,把子应用的这个 Dom 结构挂载到一个 shadow dom 上,这就要用到createElement方法。
进入createElement方法前我们先来看下目前的参数值:
- appContent:包裹了一层 id 唯一的 div,具体如上所示
- strictStyleIsolation:
true - scopedCSS:
false - appInstanceId:
react16
createElement:添加 shadow dom
那我们现在如何去创建一个 shadow dom,在前面关于 shadow dom 的讲解中我们知道,创建一个 shadow dom 我们需要两个东西:
一、挂载的 Dom 节点
二、需要添加到 shadow dom 的内容
那我们从哪里去找呢,根据传进来的参数吧,我们无疑是要对appContent进行处理了,回顾下appContent有什么,包裹了一层 div 的子应用的 HTML 模版是吧,自然而然的我们就可以以外面的 div 为挂载的 dom 节点,拿子应用的 HTML 模版为需要添加到 shadow dom 的内容,即:
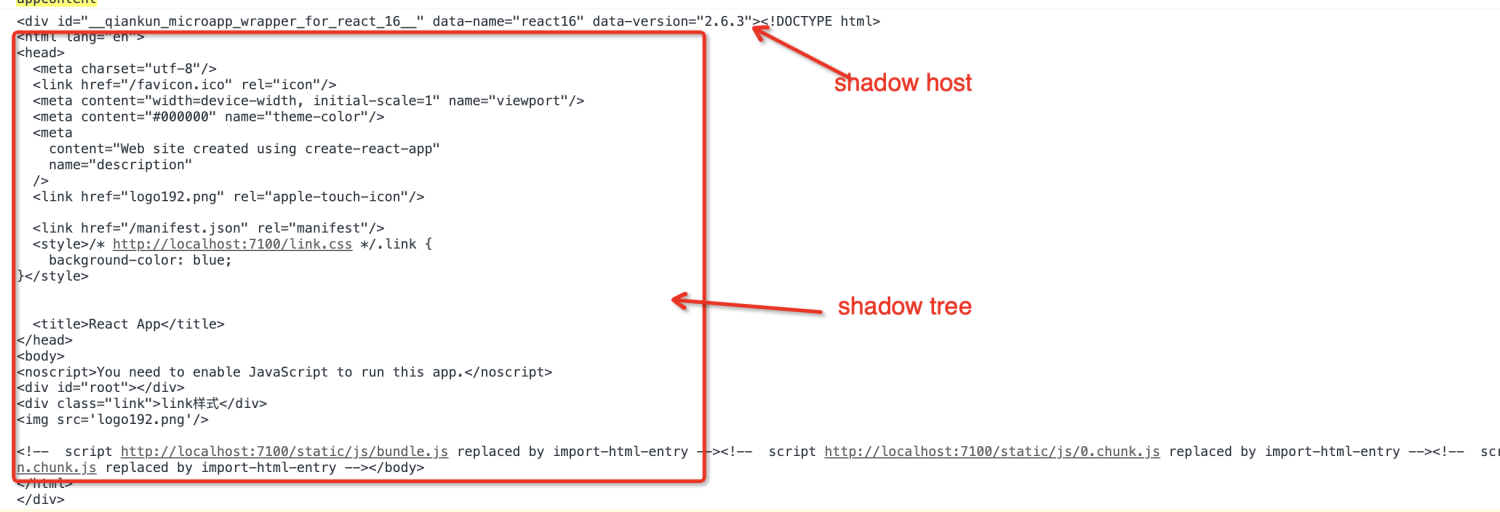
但是问题又来了, 目前的appContent是模版字符串嘞,我们咋办?这边 QianKun 的处理方案是:
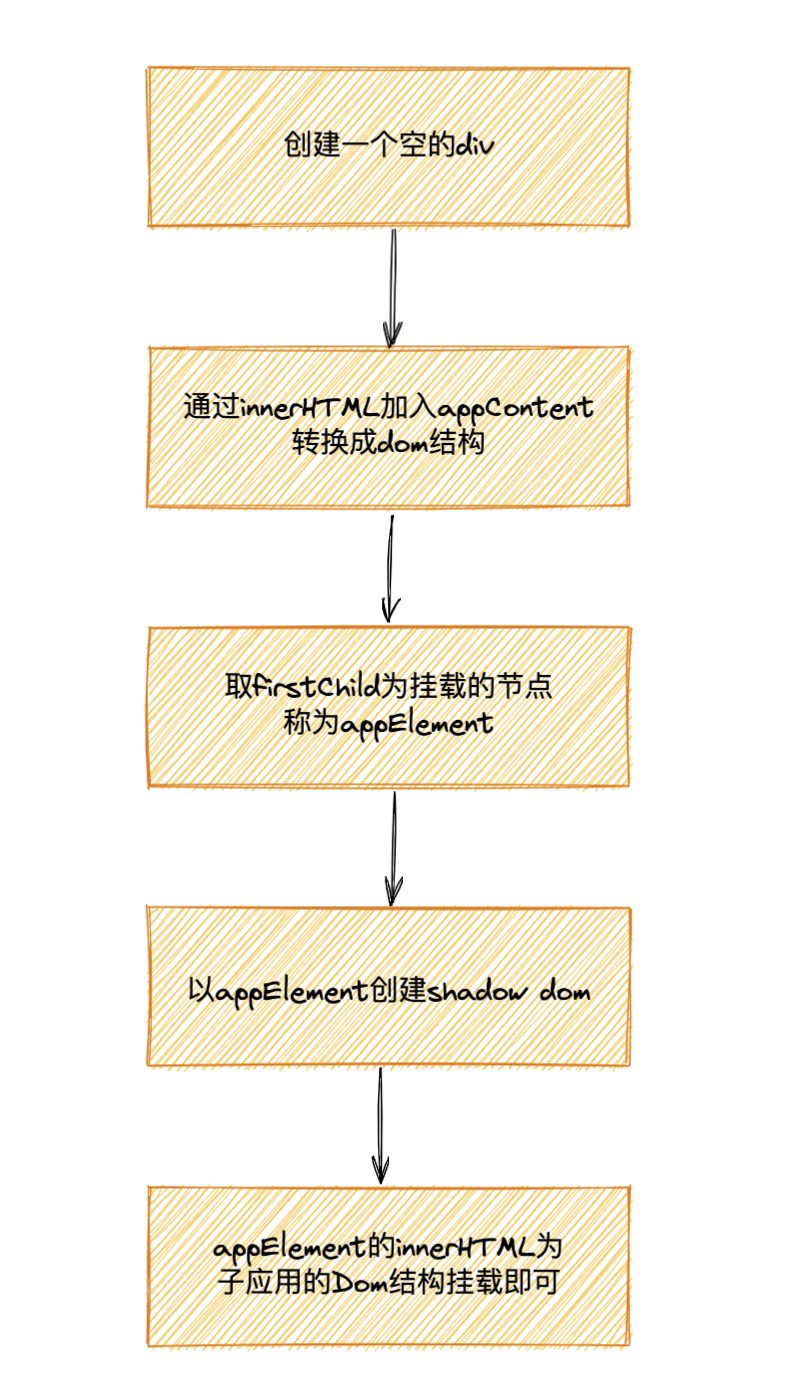
这只是个大致流程,下面让我们跟着这样的思想看下代码里处理:
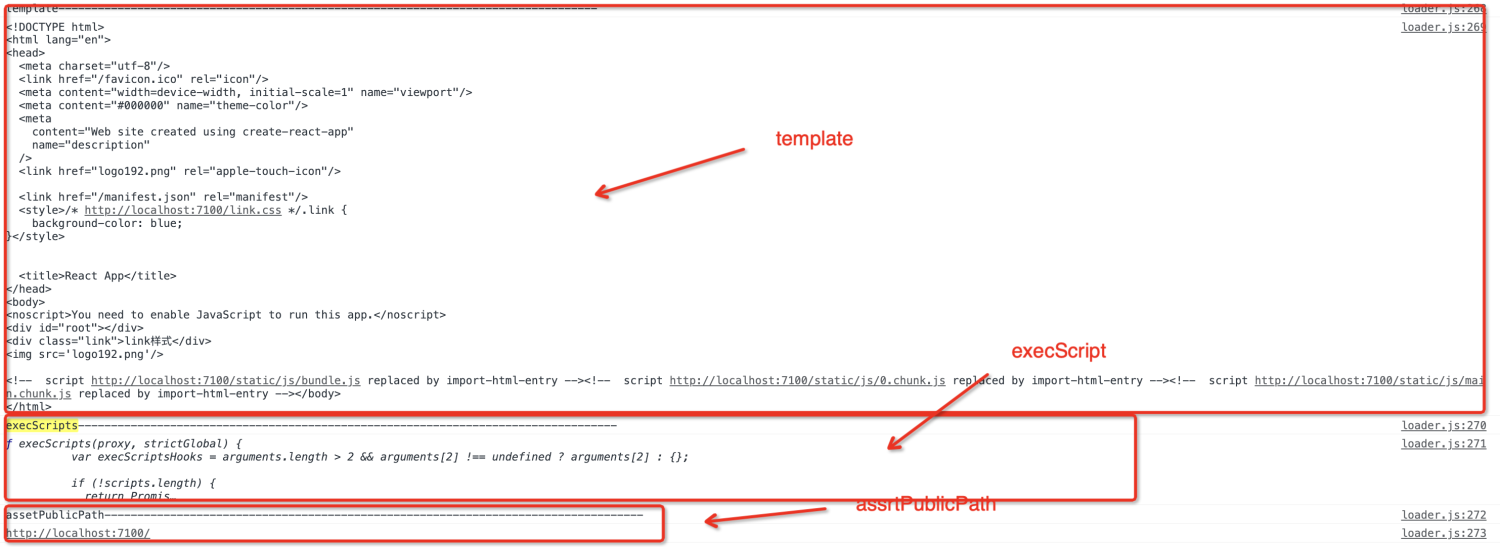
function createElement(appContent: string,strictStyleIsolation: boolean,scopedCSS: boolean,appInstanceId: string) { ... const containerElement = document.createElement('div'); containerElement.innerHTML = appContent; const appElement = containerElement.firstChild as HTMLElement; // 严格样式沙箱模式 if (strictStyleIsolation) { if (!supportShadowDOM) { console.warn( '[qiankun]: As current browser not support shadow dom, your strictStyleIsolation configuration will be ignored!', ); } else { const { innerHTML } = appElement; appElement.innerHTML = ''; let shadow: ShadowRoot; // 创建shadow dom节点 if (appElement.attachShadow) { shadow = appElement.attachShadow({ mode: 'open' }); } else { // 兼容低版本 shadow = (appElement as any).createShadowRoot(); } shadow.innerHTML = innerHTML; } } ... // 此处省略了开启experimentalStyleIsolation的处理方法 ... return appElement; } 这里有个很有意思的是:
appContent 以 innerHTML 变成 dom 结构后,HTML 模版中的<html>、<head>以及<body>会被去掉

最后我们再来看下子应用挂载到主应用的 Dom 结构:
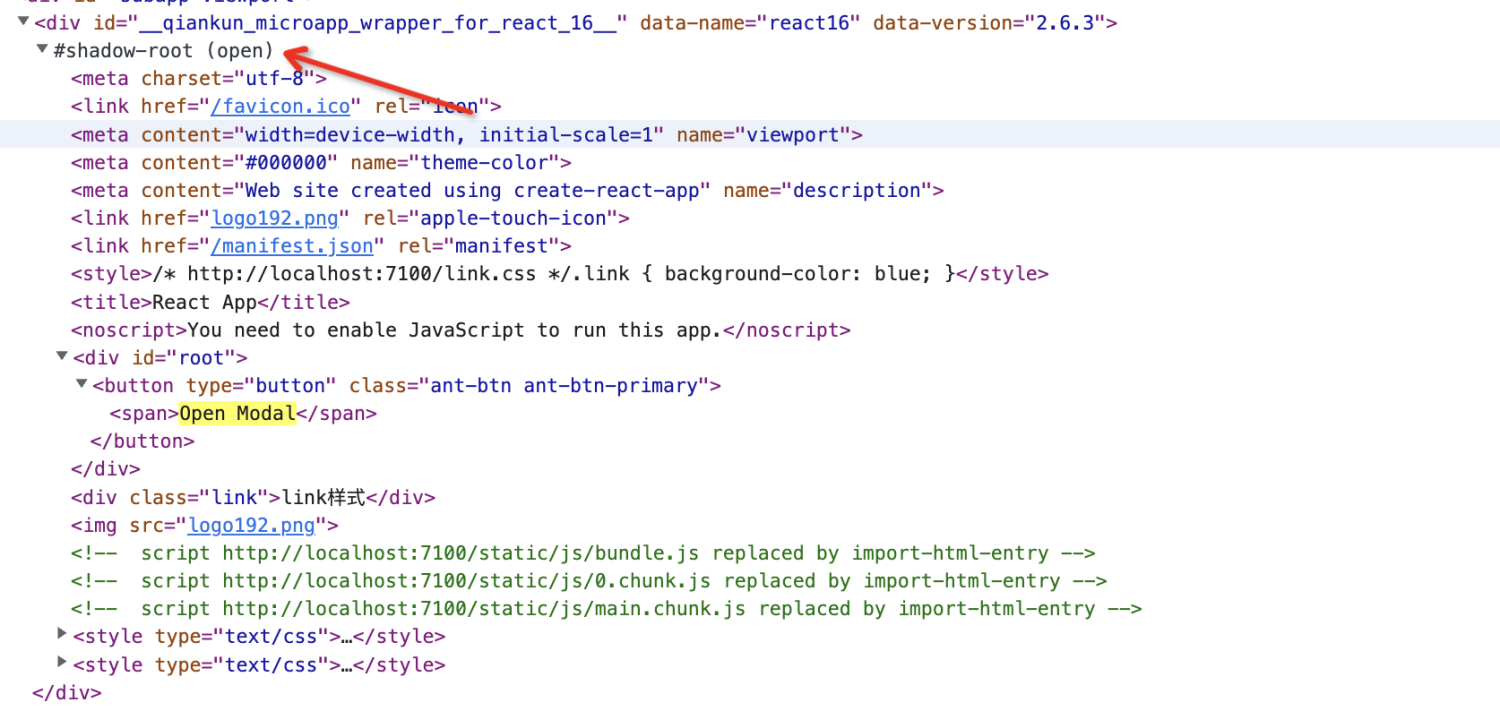
笔者在实践的过程中也遇到了一些问题:
1、微应用中使用相对路径引入图片出现加载资源 404 的问题,这边笔者没有进行过多的尝试可以参考下官方的:https://qiankun.umijs.org/zh/faq#为什么微应用加载的资源会-404
2、还有一个问题就是 react 中动态打开 Modal 失效的问题,原因可以看下‣,大概看了下和 React 的事件机制有关,即使是设置弹窗默认开启,也会出现之前上面提到的,样式丢失的问题
experimentalStyleIsolation
我们设置experimentalStyleIsolation为true时,QianKun采用的是Runtime css transformer 动态加载/卸载样式表方案,为子应用的样式表增加一个特殊的选择器从而限定影响范围,类似以下结构:
// 假设应用名是 react16 <style> .app-main { font-size: 14px; } </style> <style> div[data-qiankun="react16"] .app-main { font-size: 14px; } <style> 先来通过流程图了解下大致流程
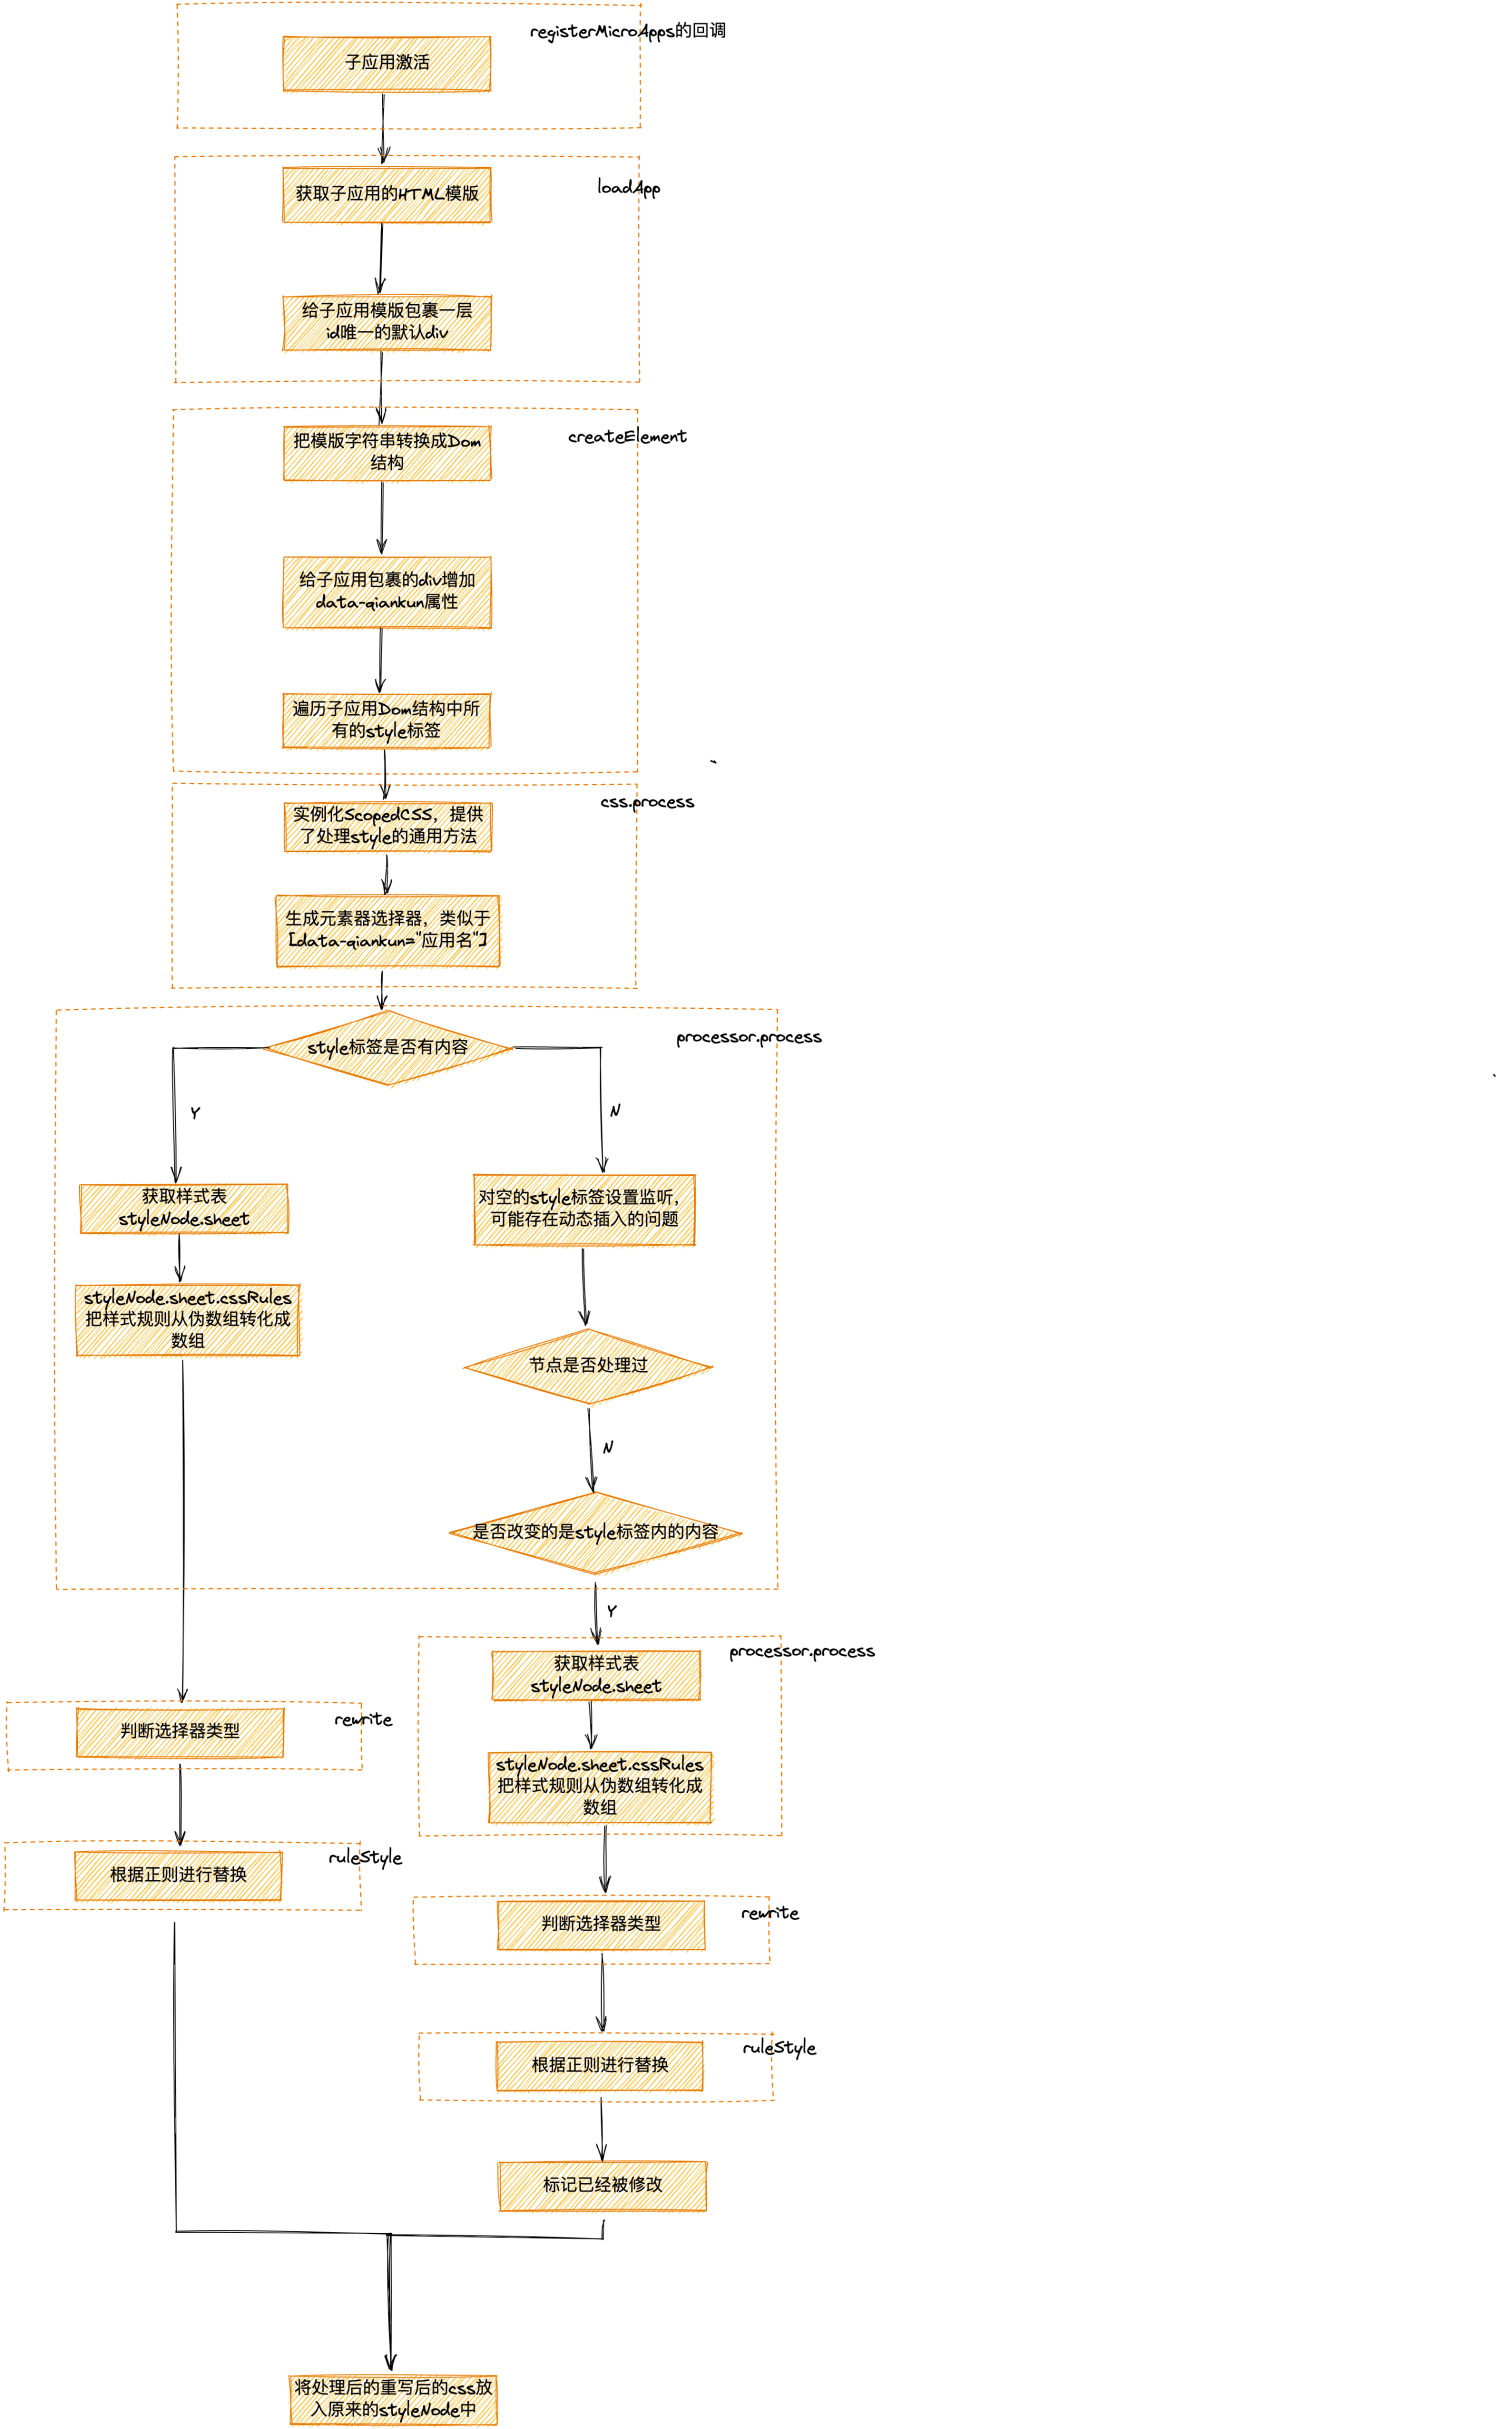
createElement:给最外层增加 data-qiankun 属性,并且获取所有 style 标签
function createElement(appContent: string, strictStyleIsolation: boolean, scopedCSS: boolean,appInstanceId: string) { ... if (scopedCSS) { // 给最外层设置data-qiankun的属性 const attr = appElement.getAttribute(css.QiankunCSSRewriteAttr); if (!attr) { appElement.setAttribute(css.QiankunCSSRewriteAttr, appInstanceId); } // 获取所有的style标签,进行遍历 const styleNodes = appElement.querySelectorAll('style') || []; forEach(styleNodes, (stylesheetElement: HTMLStyleElement) => { css.process(appElement!, stylesheetElement, appInstanceId); }); } ... } export const QiankunCSSRewriteAttr = 'data-qiankun'; 我们来看下设置完属性后的属性后的 appElement

styleNodes

css.process 详细处理
/** * 实例化ScopedCSS * 生成根元素属性选择器[data-qiankun="应用名"]前缀 */ export const process = ( appWrapper: HTMLElement, stylesheetElement: HTMLStyleElement | HTMLLinkElement, appName: string, ): void => { // 实例化ScopedCSS if (!processor) { processor = new ScopedCSS(); } ... // 一些空值的处理 const mountDOM = appWrapper; if (!mountDOM) { return; } const tag = (mountDOM.tagName || '').toLowerCase(); if (tag && stylesheetElement.tagName === 'STYLE') { // 生成前缀,根元素标签名[data-qiankun="应用名"] const prefix = `${tag}[${QiankunCSSRewriteAttr}="${appName}"]`; processor.process(stylesheetElement, prefix); } }; - prefix:
div[data-qiankun="react16"] - stylesheetElement:

进入 processor.process 看看对它进行了什么操作
// 重写样式选择器以及对于空的style节点设置MutationObserver监听,原因可能存在动态增加样式的情况 process(styleNode: HTMLStyleElement, prefix: string = '') { // 当style标签有内容时进行操作 if (styleNode.textContent !== '') { // styleNode.textContent为style标签内的内容 const textNode = document.createTextNode(styleNode.textContent || ''); // swapNode为创建的空的style标签 this.swapNode.appendChild(textNode); // 获取样式表 const sheet = this.swapNode.sheet as any; // 从样式表获取cssRules该值是标准的,把样式规则从伪数组转化成数组 const rules = arrayify<CSSRule>(sheet?.cssRules ?? []); // 通过遍历和正则重写每个选择器的前缀 const css = this.rewrite(rules, prefix); // 将处理后的重写后的css放入原来的styleNode中 styleNode.textContent = css; // 清理工具人swapNode this.swapNode.removeChild(textNode); return; } //对空的样式节点进行监听,可能存在动态插入的问题 const mutator = new MutationObserver((mutations) => { for (let i = 0; i < mutations.length; i += 1) { // mutation为变更的每个记录MutationRecord const mutation = mutations[i]; // 判断该节点是否应处理过 if (ScopedCSS.ModifiedTag in styleNode) { return; } if (mutation.type === 'childList') { const sheet = styleNode.sheet as any; const rules = arrayify<CSSRule>(sheet?.cssRules ?? []); const css = this.rewrite(rules, prefix); styleNode.textContent = css; // 增加处理节点的标识 (styleNode as any)[ScopedCSS.ModifiedTag] = true; } } }); // 监听当前的style标签,当styleNode为空的时候,以及变更的时候,比如引入的antd样式文件 mutator.observe(styleNode, { childList: true }); } Q1:为什么在style标签有内容的时候使用this.swapNode这个工具人,而在监听的时候不使用?
还记得我们是需要干什么吗?
改写style标签内的样式规则
因此这里就通过style.sheet.cssRules方式去获取 style 标签里的每一条规则进行重写,我们来看下sheet样式表的数据结构

通过这个结构我们其实下一步想要做的事情很清楚了
就是重写每一条cssRules并且通过字符串拼接赋值给style标签

但是我们得注意两点:
- 选择器不同我们的处理方式也不同
- 对选择器的匹配规则的处理
让我们看看 rewrite 具体进行了什么操作,这里主要分为两块
- 一对选择器的类型进行判断
CSSRule.type
private rewrite(rules: CSSRule[], prefix: string = '') { let css = ''; rules.forEach((rule) => { switch (rule.type) { // 普通选择器类型 case RuleType.STYLE: css += this.ruleStyle(rule as CSSStyleRule, prefix); break; // @media选择器类型 case RuleType.MEDIA: css += this.ruleMedia(rule as CSSMediaRule, prefix); break; // @supports选择器类型 case RuleType.SUPPORTS: css += this.ruleSupport(rule as CSSSupportsRule, prefix); break; default: css += `${rule.cssText}`; break; } }); return css; } - 二是进行正则替换
特殊的
// 处理类似于@media screen and (min-width: 900px) {} private ruleMedia(rule: CSSMediaRule, prefix: string) { const css = this.rewrite(arrayify(rule.cssRules), prefix); return `@media ${rule.conditionText} {${css}}`; } // 处理类似于@supports (display: grid) {} private ruleSupport(rule: CSSSupportsRule, prefix: string) { const css = this.rewrite(arrayify(rule.cssRules), prefix); return `@supports ${rule.conditionText} {${css}}`; } 普通的
// prefix为"div[data-qiankun="react16"]" private ruleStyle(rule: CSSStyleRule, prefix: string) { // 根选择器,比如body、html以及:root const rootSelectorRE = /((?:[^w-.#]|^)(body|html|:root))/gm; // 根组合选择器,类似于 html body{...} const rootCombinationRE = /(html[^w{[]+)/gm; // 获取选择器 const selector = rule.selectorText.trim(); // 获取样式文本,比如"html { font-family: sans-serif; line-height: 1.15; text-size-adjust: 100%; -webkit-tap-highlight-color: rgba(0, 0, 0, 0); }" let { cssText } = rule; // 对根选择器(body、html、:root)进行判断,替换成prefix if (selector === 'html' || selector === 'body' || selector === ':root') { return cssText.replace(rootSelectorRE, prefix); } // 对于根组合选择器进行匹配 if (rootCombinationRE.test(rule.selectorText)) { const siblingSelectorRE = /(html[^w{]+)(+|~)/gm; // 对于非标准的兄弟选择器转换时进行忽略,置空处理 if (!siblingSelectorRE.test(rule.selectorText)) { cssText = cssText.replace(rootCombinationRE, ''); } } // 普通选择器匹配 cssText = cssText.replace(/^[sS]+{/, (selectors) => // selectors为类似于.link{ selectors.replace(/(^|,n?)([^,]+)/g, (item, p, s) => { // 处理类似于div,body,span { ... },含有根元素的 if (rootSelectorRE.test(item)) { return item.replace(rootSelectorRE, (m) => { const whitePrevChars = [',', '(']; // 将其中的根元素替换为前缀保留,或者( if (m && whitePrevChars.includes(m[0])) { return `${m[0]}${prefix}`; } // 直接把根元素替换成前缀 return prefix; }); } return `${p}${prefix} ${s.replace(/^ */, '')}`; }), ); return cssText; } 动态添加样式的思考?
那么通过 JS 动态添加的style、link或者script标签是不是也需要运行在相应的CSS或者JS沙箱中呢,添加这些标签的常见方法无疑是createElement、appendChild和insertBefore,那其实我们只要对他们设置监听就可以了
dynamicAppend就是用来解决上面的问题的,它暴露了两个方法
- patchStrictSandbox:QianKun JS 沙箱模式的多例模式
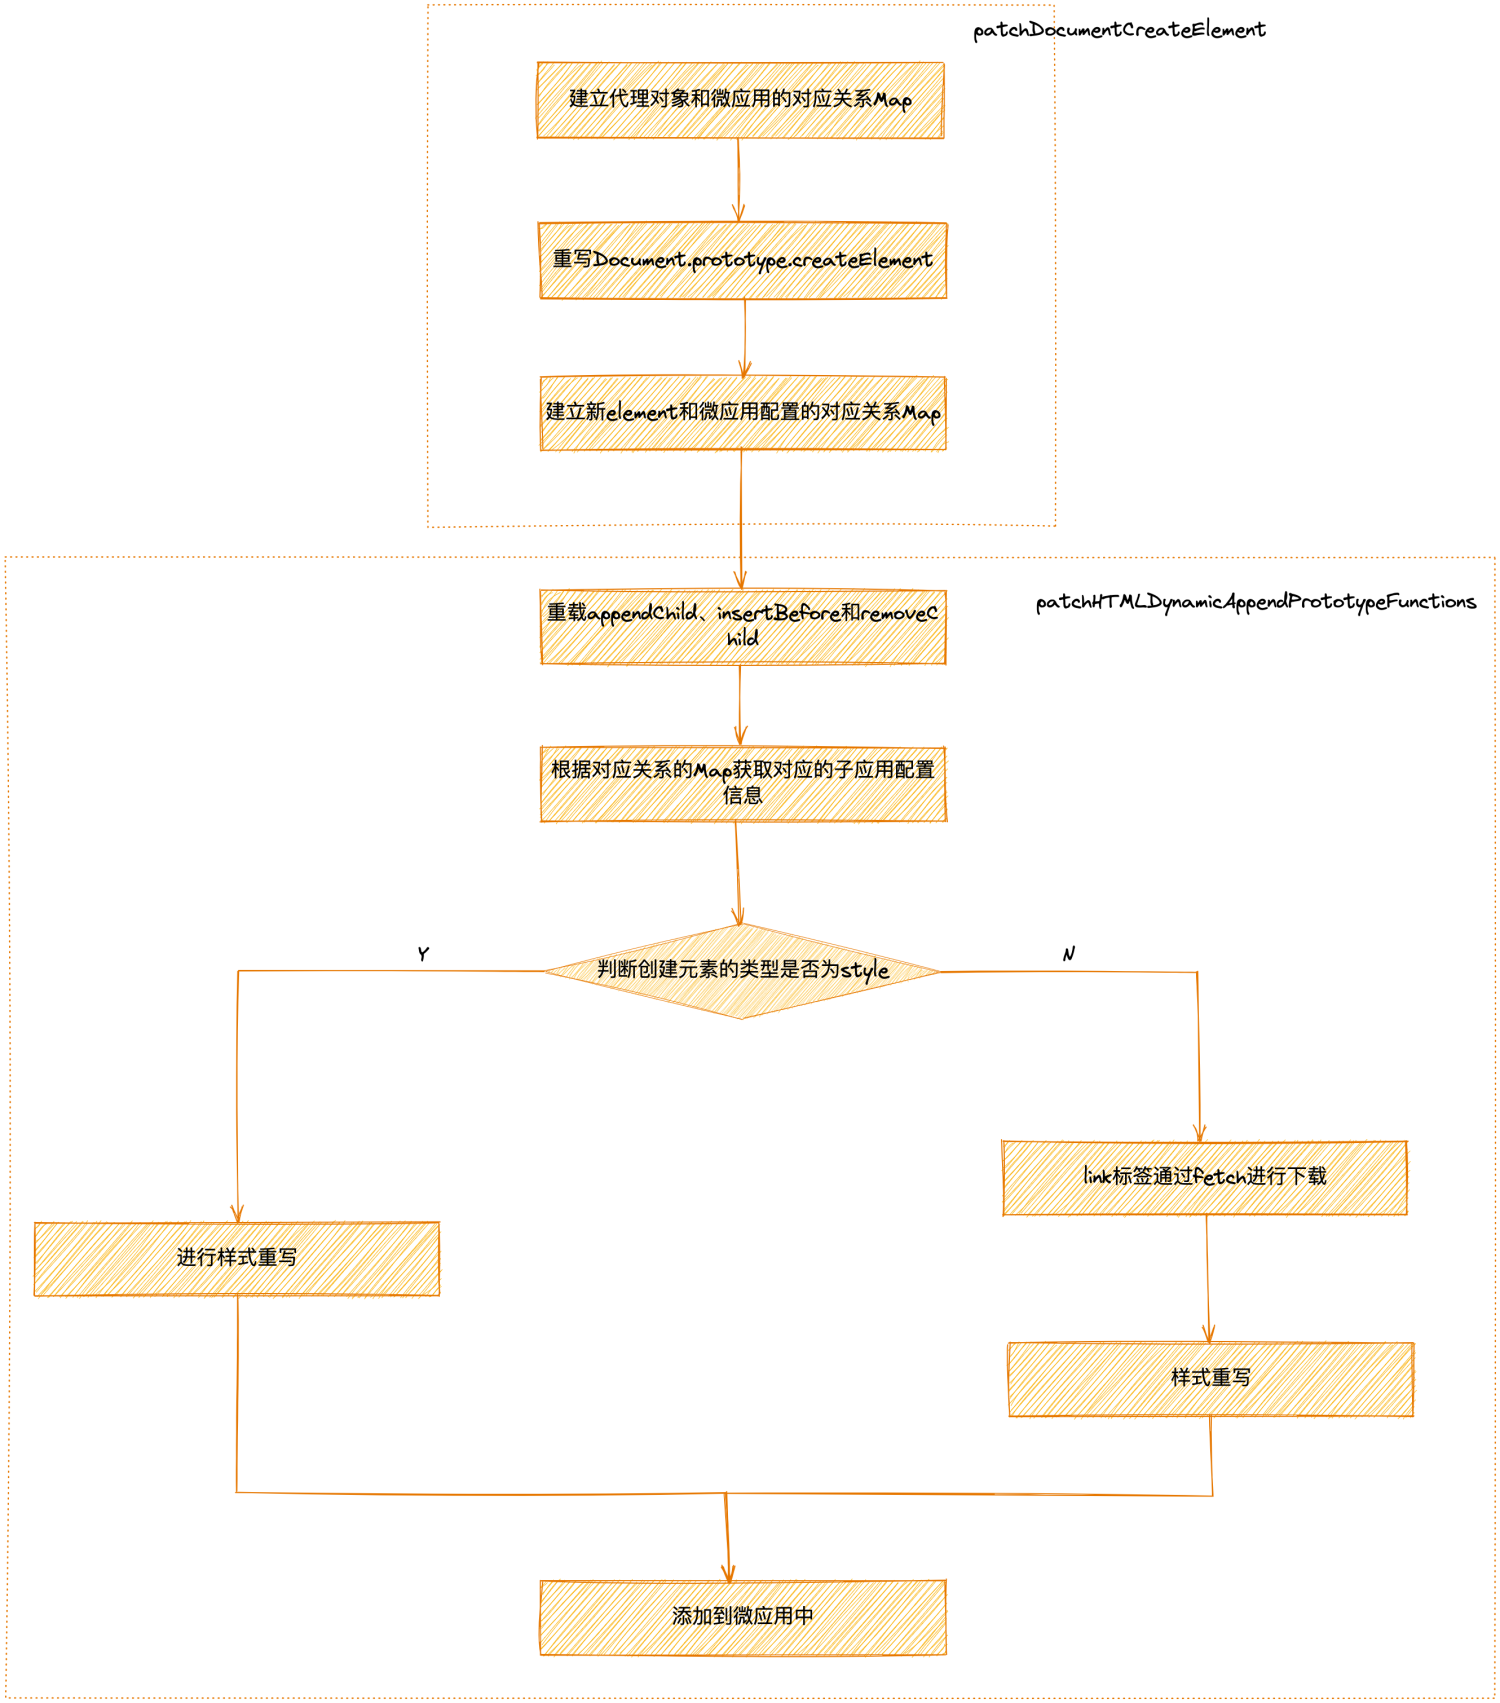
patchStrictSandbox
export function patchStrictSandbox( appName: string, // 返回包裹子应用的那一块Dom结构 appWrapperGetter: () => HTMLElement | ShadowRoot, proxy: Window, mounting = true, scopedCSS = false, excludeAssetFilter?: CallableFunction, ){ ... let containerConfig = proxyAttachContainerConfigMap.get(proxy); if (!containerConfig) { containerConfig = { appName, proxy, appWrapperGetter, dynamicStyleSheetElements: [], strictGlobal: true, excludeAssetFilter, scopedCSS, }; // 建立了代理对象和子应用配置信息Map关系 proxyAttachContainerConfigMap.set(proxy, containerConfig); } // 重写Document.prototype.createElement const unpatchDocumentCreate = patchDocumentCreateElement(); // 重写appendChild、insertBefore const unpatchDynamicAppendPrototypeFunctions = patchHTMLDynamicAppendPrototypeFunctions( (element) => elementAttachContainerConfigMap.has(element), (element) => elementAttachContainerConfigMap.get(element)!, ); ... } - 重写
Document.prototype.createElement - 重写
appendChild、insertBefore
patchDocumentCreateElement
function patchDocumentCreateElement() { // 记录createElement是否被重写 const docCreateElementFnBeforeOverwrite = docCreatePatchedMap.get(document.createElement); if (!docCreateElementFnBeforeOverwrite) { const rawDocumentCreateElement = document.createElement; // 重写Document.prototype.createElement Document.prototype.createElement = function createElement<K extends keyof HTMLElementTagNameMap>( this: Document, tagName: K, options?: ElementCreationOptions, ): HTMLElement { const element = rawDocumentCreateElement.call(this, tagName, options); // 判断创建的是否为style、link和script标签 if (isHijackingTag(tagName)) { const { window: currentRunningSandboxProxy } = getCurrentRunningApp() || {}; if (currentRunningSandboxProxy) { // 获取子应用的配置信息 const proxyContainerConfig = proxyAttachContainerConfigMap.get(currentRunningSandboxProxy); if (proxyContainerConfig) { // 建立新元素element和子应用配置的对应关系 elementAttachContainerConfigMap.set(element, proxyContainerConfig); } } } return element; }; if (document.hasOwnProperty('createElement')) { // 重写 document.createElement = Document.prototype.createElement; } docCreatePatchedMap.set(Document.prototype.createElement, rawDocumentCreateElement); } } function isHijackingTag(tagName?: string) { return ( tagName?.toUpperCase() === LINK_TAG_NAME || tagName?.toUpperCase() === STYLE_TAG_NAME || tagName?.toUpperCase() === SCRIPT_TAG_NAME ); } - 重写
document.createElement - 建立新元素 element 和子应用配置的对应关系
elementAttachContainerConfigMap
patchHTMLDynamicAppendPrototypeFunctions
export function patchHTMLDynamicAppendPrototypeFunctions( isInvokedByMicroApp: (element: HTMLElement) => boolean, containerConfigGetter: (element: HTMLElement) => ContainerConfig, ) { // 当appendChild和insertBefore没有被重写的时候 if ( HTMLHeadElement.prototype.appendChild === rawHeadAppendChild && HTMLBodyElement.prototype.appendChild === rawBodyAppendChild && HTMLHeadElement.prototype.insertBefore === rawHeadInsertBefore ) { HTMLHeadElement.prototype.appendChild = getOverwrittenAppendChildOrInsertBefore({ rawDOMAppendOrInsertBefore: rawHeadAppendChild, containerConfigGetter, isInvokedByMicroApp, }) as typeof rawHeadAppendChild; HTMLBodyElement.prototype.appendChild = getOverwrittenAppendChildOrInsertBefore({ rawDOMAppendOrInsertBefore: rawBodyAppendChild, containerConfigGetter, isInvokedByMicroApp, }) as typeof rawBodyAppendChild; HTMLHeadElement.prototype.insertBefore = getOverwrittenAppendChildOrInsertBefore({ rawDOMAppendOrInsertBefore: rawHeadInsertBefore as any, containerConfigGetter, isInvokedByMicroApp, }) as typeof rawHeadInsertBefore; }} - 当 appendChild、appendChild 和 insertBefore 没有被重写的时候进行重写
getOverwrittenAppendChildOrInsertBefore
function getOverwrittenAppendChildOrInsertBefore(opts: { rawDOMAppendOrInsertBefore: <T extends Node>(newChild: T, refChild?: Node | null) => T; isInvokedByMicroApp: (element: HTMLElement) => boolean; containerConfigGetter: (element: HTMLElement) => ContainerConfig; }) { return function appendChildOrInsertBefore<T extends Node>( this: HTMLHeadElement | HTMLBodyElement, newChild: T, refChild: Node | null = null, ) { let element = newChild as any; const { rawDOMAppendOrInsertBefore, isInvokedByMicroApp, containerConfigGetter } = opts; // 当不是style、link或者是script标签的时候或者在元素的创建找不到对应的子应用配置信息时,走原生的方法 if (!isHijackingTag(element.tagName) || !isInvokedByMicroApp(element)) { return rawDOMAppendOrInsertBefore.call(this, element, refChild) as T; } if (element.tagName) { // 获取当前子应用的配置信息 const containerConfig = containerConfigGetter(element); const { appName, appWrapperGetter, proxy, strictGlobal, dynamicStyleSheetElements, scopedCSS, excludeAssetFilter, } = containerConfig; switch (element.tagName) { case LINK_TAG_NAME: case STYLE_TAG_NAME: { let stylesheetElement: HTMLLinkElement | HTMLStyleElement = newChild as any; const { href } = stylesheetElement as HTMLLinkElement; // 配置项不需要被劫持的资源 if (excludeAssetFilter && href && excludeAssetFilter(href)) { return rawDOMAppendOrInsertBefore.call(this, element, refChild) as T; } // 挂载的dom结构,即子应用的dom结构 const mountDOM = appWrapperGetter(); // 如果开启了实验性的样式沙箱模式 if (scopedCSS) { // exclude link elements like <link rel="icon" href="favicon.ico"> const linkElementUsingStylesheet = element.tagName?.toUpperCase() === LINK_TAG_NAME && (element as HTMLLinkElement).rel === 'stylesheet' && (element as HTMLLinkElement).href; // 对于link标签进行样式资源下载,并进行样式的重写 if (linkElementUsingStylesheet) { const fetch = typeof frameworkConfiguration.fetch === 'function' ? frameworkConfiguration.fetch : frameworkConfiguration.fetch?.fn; stylesheetElement = convertLinkAsStyle( element, (styleElement) => css.process(mountDOM, styleElement, appName), fetch, ); dynamicLinkAttachedInlineStyleMap.set(element, stylesheetElement); } else { css.process(mountDOM, stylesheetElement, appName); } } // 重写以后的style标签 dynamicStyleSheetElements.push(stylesheetElement); const referenceNode = mountDOM.contains(refChild) ? refChild : null; return rawDOMAppendOrInsertBefore.call(mountDOM, stylesheetElement, referenceNode); } ... } - patchLooseSandbox:QianKun JS 沙箱模式的单例模式和快照模式下
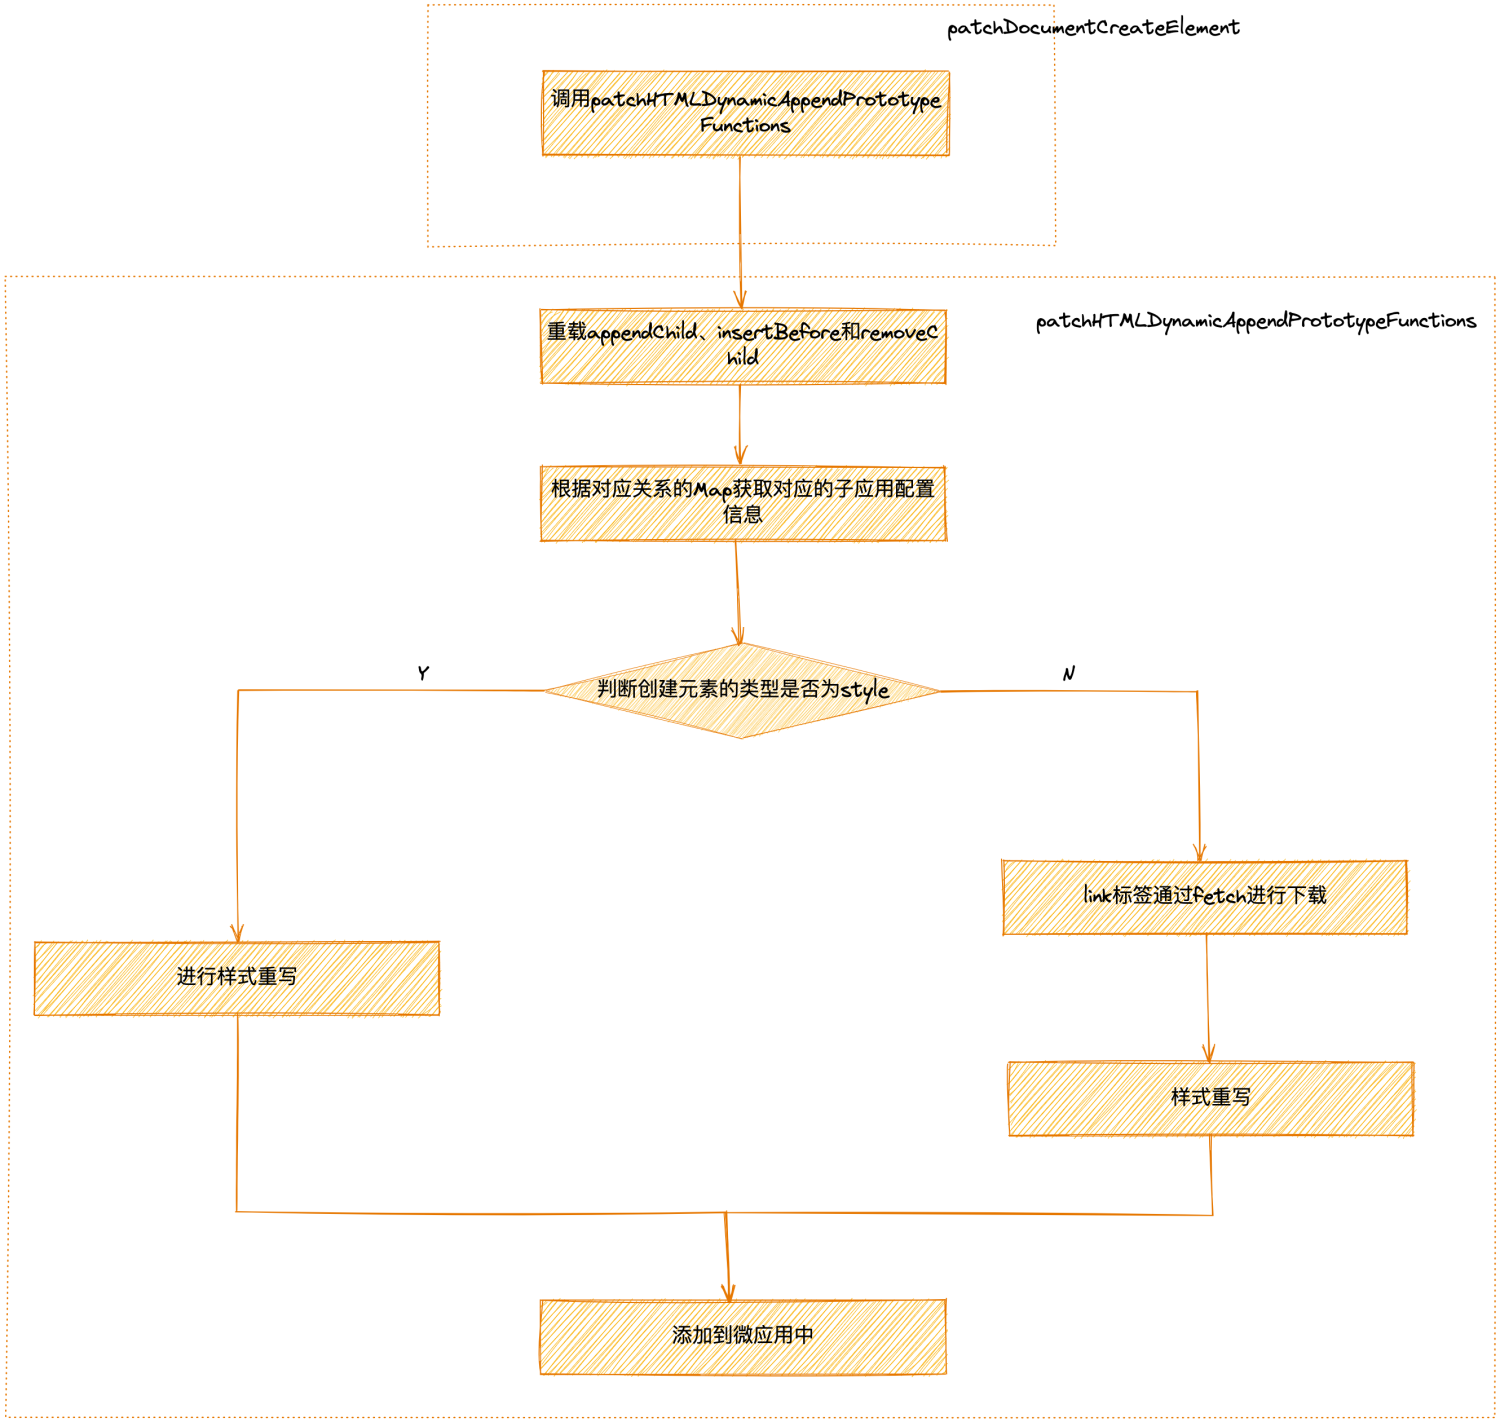
export function patchLooseSandbox( appName: string, appWrapperGetter: () => HTMLElement | ShadowRoot, proxy: Window, mounting = true, scopedCSS = false, excludeAssetFilter?: CallableFunction, ): Freer { let dynamicStyleSheetElements: Array<HTMLLinkElement | HTMLStyleElement> = []; const unpatchDynamicAppendPrototypeFunctions = patchHTMLDynamicAppendPrototypeFunctions( // 判断当前微应用是否运行 () => checkActivityFunctions(window.location).some((name) => name === appName), // 返回微应用的配置信息 () => ({ appName, appWrapperGetter, proxy, strictGlobal: false, scopedCSS, dynamicStyleSheetElements, excludeAssetFilter, }), ); } 由于是单例模式修改的还是全局的 window 去掉了对document.createElement的重写,不需要建立微应用和新建元素的一一对应


