- A+
其他章节请看:
中后台集成低代码预研
背景
笔者目前维护一个 react 中后台系统(以 spug 为例),每次来了新的需求都需要前端人员重新开发。
前面我们已经对低代码有了一定的认识,如果能通过一个可视化的配置页面就能完成前端开发,将极大的提高前端(或后端)的效率。甚至能加快企业内部数字化(信息化)建设。
低代码介绍
低代码这一概念由 Forrester 在 2014 年正式提出。低代码,顾名思义,就是指开发者写很少的代码,通过低代码平台提供的界面、逻辑、对象、流程等可视化编排工具来完成大量的开发工作,降低软件开发中的不确定性和复杂性。实现软件的高效构建,无需重复传统的手动编程,同时兼顾业务人员和专业开发人员的更多参与。
零代码属于低代码平台的一种,不提供或者仅支持有限的编程扩展能力,技术门槛低,应用场景有限。
目标
| 最优 | 稍次 |
|---|---|
通过低代码平台配置系统所有前端页面 |
通过低代码平台配置系统大部分前端页面 |
预研产品
amis
amis 是百度的一个低代码前端框架,它使用 JSON 配置来生成页面,可以减少页面开发工作量,极大提升效率。开源免费,github Star 13.4k。
包含两个项目:amis 和 amis-editor(前些天已开源)。amis-editor 通过可视化形式生成页面,画原型的功夫就将前端页面给开发好了,最后生成该页面的配置(一个json),该配置放入 amis 解析出来就是一个前端页面。
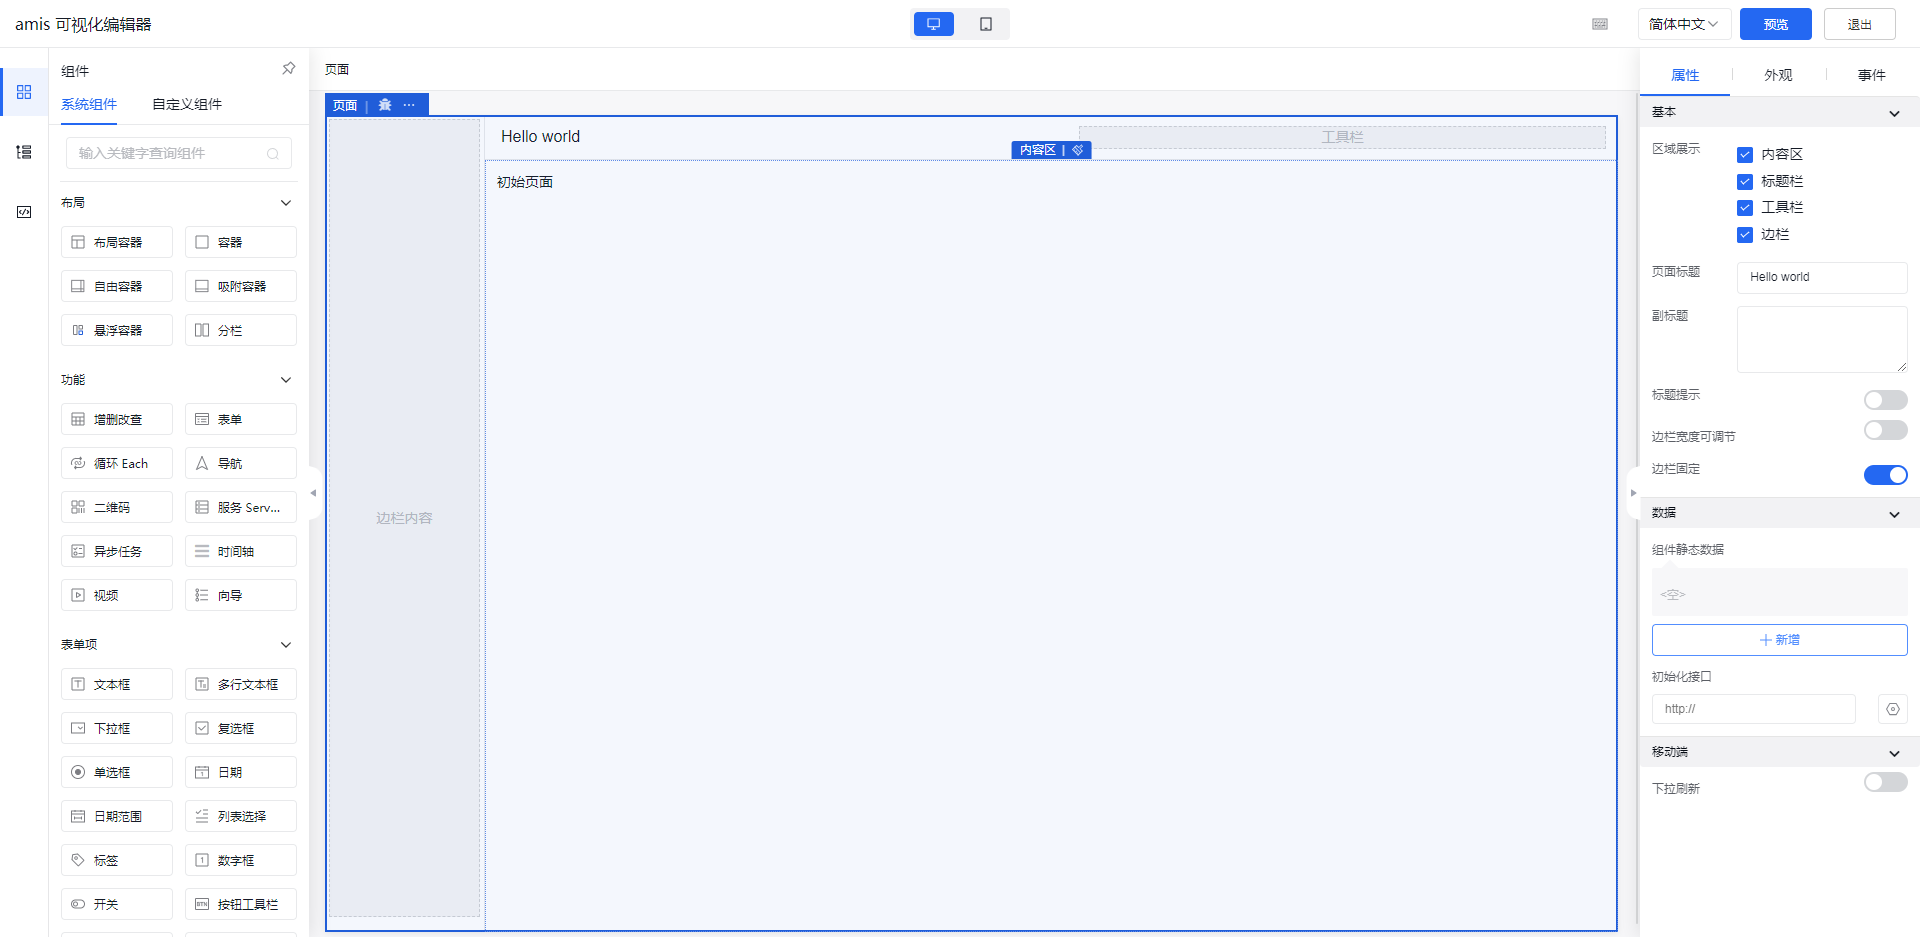
amis 在线编辑器如下:
爱速搭
爱速搭是百度智能云推出的低代码开发平台,它灵活性强,对开发者友好,在百度内部大规模使用,有超过 4w 内部页面是基于它制作的,是百度内部中台系统的核心基础设施。支持私有部署,收费。
Tip: amis 是爱速搭团队开源的前端低代码框架,爱速搭应用中的页面都是基于 amis 渲染的,同时爱速搭平台自身的绝大部分页面也是基于 amis 开发 —— 爱速搭与amis
lowcode-engine
阿里低代码引擎(lowcode-engine)是一款为低代码平台开发者提供的,具备强大定制扩展能力的低代码设计器研发框架。免费。

Tip: 前面笔者也稍微实现了一个简单的可视化编辑器,有些麻烦,也有很多不足。真实场景倾向使用成熟的编辑器。
钉钉宜搭
钉钉宜搭是阿里巴巴自研的低代码应用开发平台,基于阿里云的云基础设施和钉钉的企业数字化操作系统,为每个组织提供低门槛、高效率的数字化业务应用生产新模式。在宜搭上生产的每个应用天然具备互联互通、数据驱动、安全可控的特点。收费。
在宜搭模版市场提供了一些免费应用模版,只需选择一个模版修改个别文案,一分钟就能搭建一款专属应用
方案概要
市面上确实存在帮助企业加快数字化建设的低代码平台,通过该平台能较快的搭建各种系统,但通常是收费的。
通过各类低代码产品的预研,也结合笔者当前工作需求:免费、内网部署、灵活)。目标求其次:通过低代码平台配置系统大部分前端页面。
方案筛选:
- amis vs 爱速搭:amis 免费
- amis vs lowcode-engine: amis 更全,包含编辑器和渲染器(解析 json 成前端页面),而 lowcode-engine 只是一个编辑器。倘若需要自建一个低代码平台, lowcode-engine 是一个不错的选择
最终方案:中后台系统(spug) + amis + amis-editor(开源、免费)。就像这样:
- amis-editor 配置页面,生成 json
- amis 通过 json 渲染出页面
- spug 集成 amis
方案可行性
通过 amis-editor 可视化操作快速创建页面,然后将配置放入 amis 中解析,实现大部分前端页面的可视化生成。
接口数据
本地启动一个 node 服务,用于模拟接口数据。
使用其他服务也可以,只要发送请求能返回数据(数据参考 amis 官网,直接使用 amis 官网的接口报跨域失败)。就像这样:
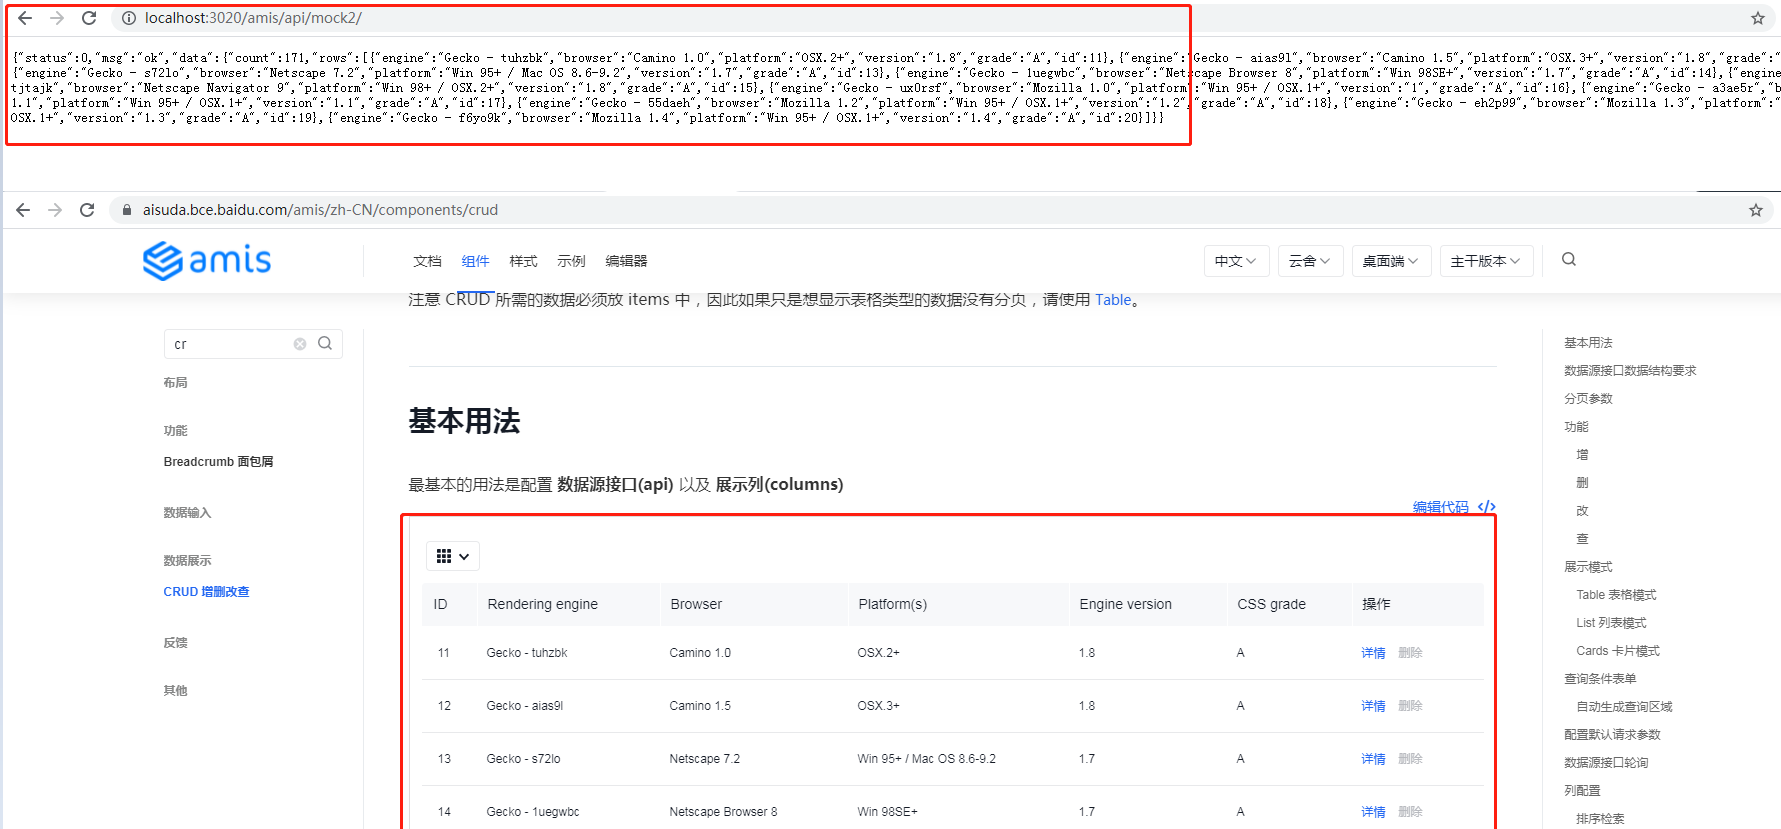
node 服务
初始化项目 local-mock:
$ mkdir local-mock $ cd local-mock // 初始化项目 $ npm init -y 修改如下 package.json:
{ "name": "local-mock", "version": "1.0.0", "description": "", "main": "index.js", "scripts": { "test": "echo "Error: no test specified" && exit 1" }, "keywords": [], "author": "", "license": "ISC", "dependencies": { "body-parser": "^1.20.2", "cookie-parser": "^1.4.6", "cors": "^2.8.5", "express": "^4.18.2" }, "devDependencies": { "nodemon": "^2.0.22" } } 新建 node.js(注:允许来自 http://localhost 的跨域请求):
// node.js var express = require('express'); var app = express(); // 跨域参考:https://blog.csdn.net/gdutRex/article/details/103636581 var allowCors = function (req, res, next) { // 注:笔者使用 `*` 仍报跨域问题,修改为请求地址(`http://localhost`)即可。 res.header('Access-Control-Allow-Origin', 'http://localhost'); res.header('Access-Control-Allow-Methods', 'GET,PUT,POST,DELETE,OPTIONS'); res.header('Access-Control-Allow-Headers', 'Content-Type,lang,sfopenreferer '); res.header('Access-Control-Allow-Credentials', 'true'); next(); }; //使用跨域中间件 app.use(allowCors); // mock数据来自 amis 官网示例:https://aisuda.bce.baidu.com/amis/zh-CN/components/crud const data1 = {"status":0,"msg":"ok","data":{"count":171,"rows":[{"engine":"Gecko - tuhzbk","browser":"Camino 1.0","platform":"OSX.2+","version":"1.8","grade":"A","id":11},{"engine":"Gecko - aias9l","browser":"Camino 1.5","platform":"OSX.3+","version":"1.8","grade":"A","id":12},{"engine":"Gecko - s72lo","browser":"Netscape 7.2","platform":"Win 95+ / Mac OS 8.6-9.2","version":"1.7","grade":"A","id":13},{"engine":"Gecko - 1uegwbc","browser":"Netscape Browser 8","platform":"Win 98SE+","version":"1.7","grade":"A","id":14},{"engine":"Gecko - tjtajk","browser":"Netscape Navigator 9","platform":"Win 98+ / OSX.2+","version":"1.8","grade":"A","id":15},{"engine":"Gecko - ux0rsf","browser":"Mozilla 1.0","platform":"Win 95+ / OSX.1+","version":"1","grade":"A","id":16},{"engine":"Gecko - a3ae5r","browser":"Mozilla 1.1","platform":"Win 95+ / OSX.1+","version":"1.1","grade":"A","id":17},{"engine":"Gecko - 55daeh","browser":"Mozilla 1.2","platform":"Win 95+ / OSX.1+","version":"1.2","grade":"A","id":18},{"engine":"Gecko - eh2p99","browser":"Mozilla 1.3","platform":"Win 95+ / OSX.1+","version":"1.3","grade":"A","id":19},{"engine":"Gecko - f6yo9k","browser":"Mozilla 1.4","platform":"Win 95+ / OSX.1+","version":"1.4","grade":"A","id":20}]}} const data2 = { "status": 0, "msg": "ok" } // 查询 app.get('/amis/api/mock2/', function (req, res) { res.end(JSON.stringify(data1)); }) // 新增 app.post('/amis/api/mock2/', function (req, res) { res.end(JSON.stringify(data2)); }) // 监听3000端口 var server = app.listen(3020, function () { console.log('listening at =====> http://127.0.0.1:3020...'); }); 编辑器
下载 amis-editor-demo,通过 npm i 安装依赖,然后 npm run dev 本地启动编辑器:
Administrator@3L-WK-10 MINGW64 /e/amis-editor-demo-master (master) $ npm run dev > amis-editor-demo@1.0.0 dev E:amis-editor-demo-master > amis dev _/ _/_/_/ _/_/_/ _/_/ _/_/_/ _/ _/ _/ _/ _/ _/ _/_/ _/ _/ _/ _/ _/ _/ _/_/ _/_/_/ _/ _/ _/ _/ _/_/_/ 当前版本:v3.1.8. - [amis]开启调试模式... <i> [webpack-dev-middleware] wait until bundle finished assets by path *.js 66.8 MiB assets by chunk 28.6 MiB (id hint: vendors) 53 assets + 61 assets assets by info 4.13 MiB [immutable] assets by chunk 2.92 MiB (auxiliary name: editor) 17 assets + 5 assets assets by path *.css 5.07 MiB assets by chunk 224 KiB (id hint: vendors) 2 assets asset index.css 2.98 MiB [emitted] (name: index) asset editor.css 1.87 MiB [emitted] (name: editor) assets by path *.html 1.31 KiB asset editor.html 674 bytes [emitted] asset index.html 672 bytes [emitted] Entrypoint index 13.7 MiB (4.06 MiB) = index.css 2.98 MiB index.js 10.7 MiB 21 auxiliary assets Entrypoint editor 12.6 MiB (2.92 MiB) = editor.css 1.87 MiB editor.js 10.8 MiB 17 auxiliary assets runtime modules 1.06 MiB 652 modules orphan modules 3.34 MiB (javascript) 4.13 MiB (asset) [orphan] 106 modules javascript modules 31.1 MiB modules by path ./node_modules/ 31.1 MiB 3639 modules modules by path ./src/ 38.4 KiB 22 modules css modules 3.15 MiB modules by path ./node_modules/monaco-editor/esm/vs/ 138 KiB 68 modules modules by path ./node_modules/amis/ 2.65 MiB 3 modules modules by path ./node_modules/@fortawesome/fontawesome-free/css/*.css 113 KiB 2 modules + 3 modules json modules 1.93 MiB ./node_modules/amis/schema.json 1.9 MiB [built] 输出有点错误,不管它,浏览器访问 http://localhost:80 即可进入编辑器页面。
下面笔者快速演示配置一个有增加、删除、编辑、查询的页面。就像这样:
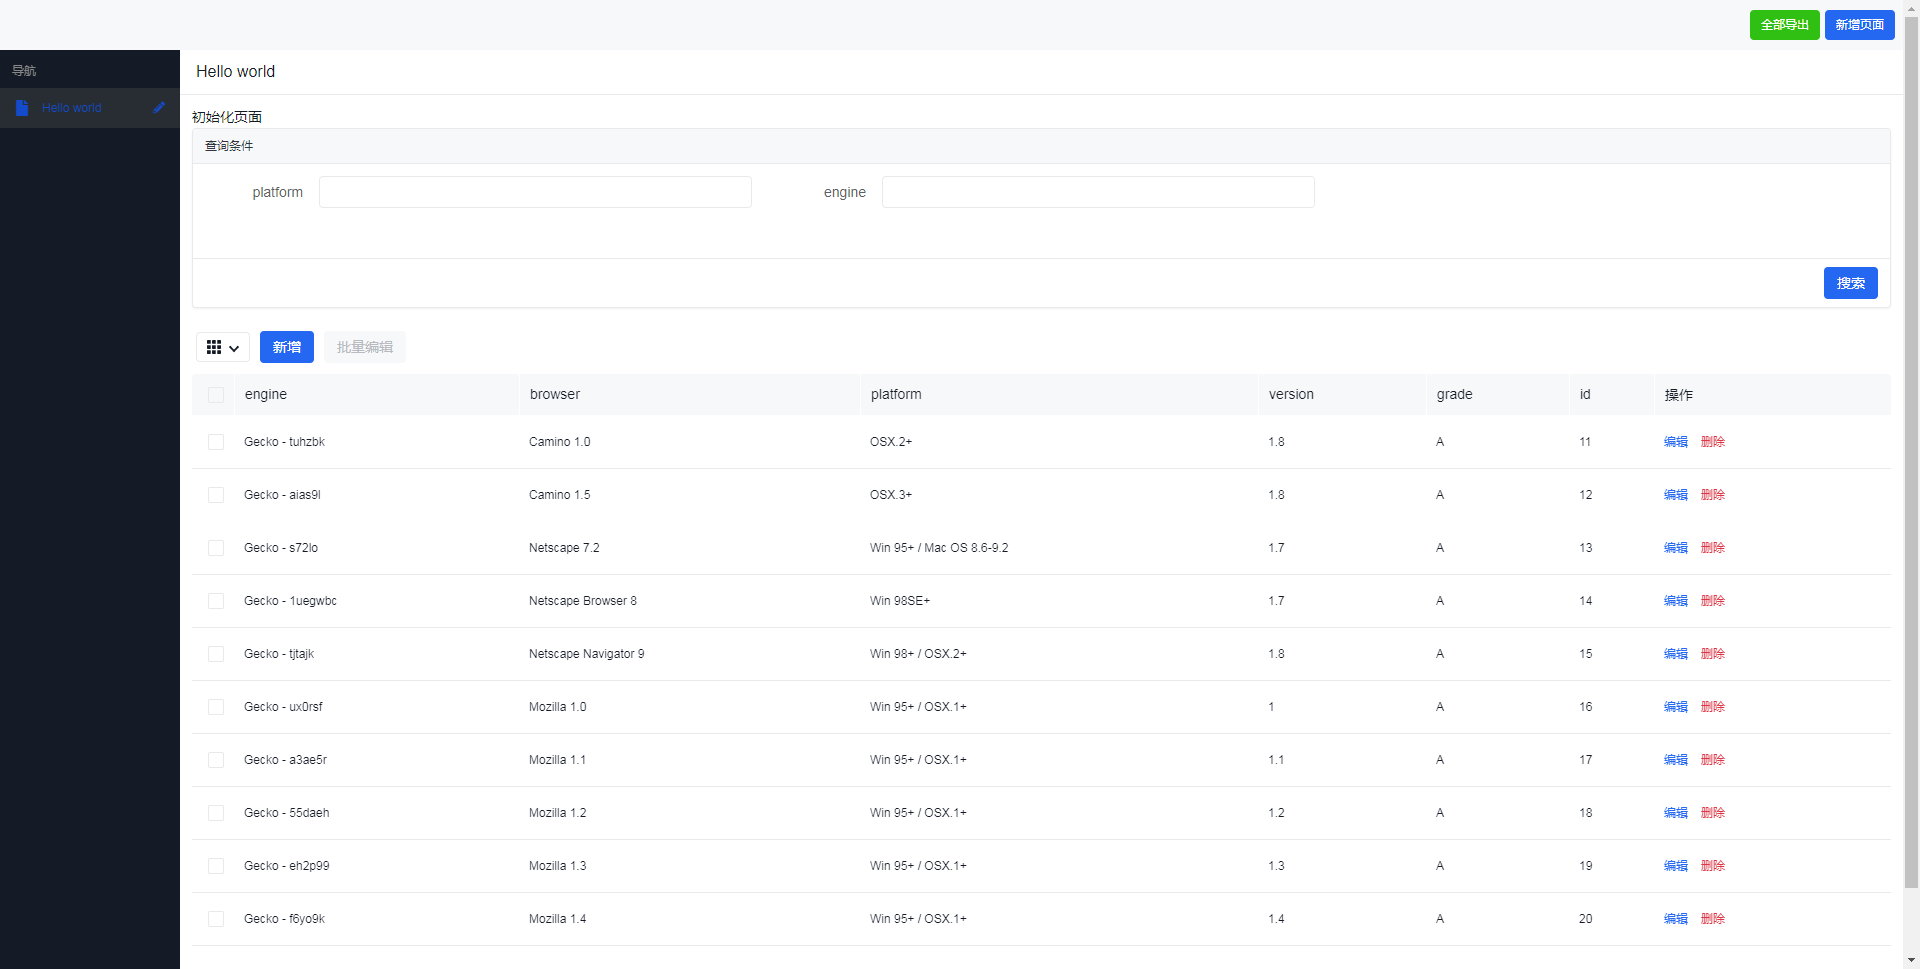
配置过程如下:
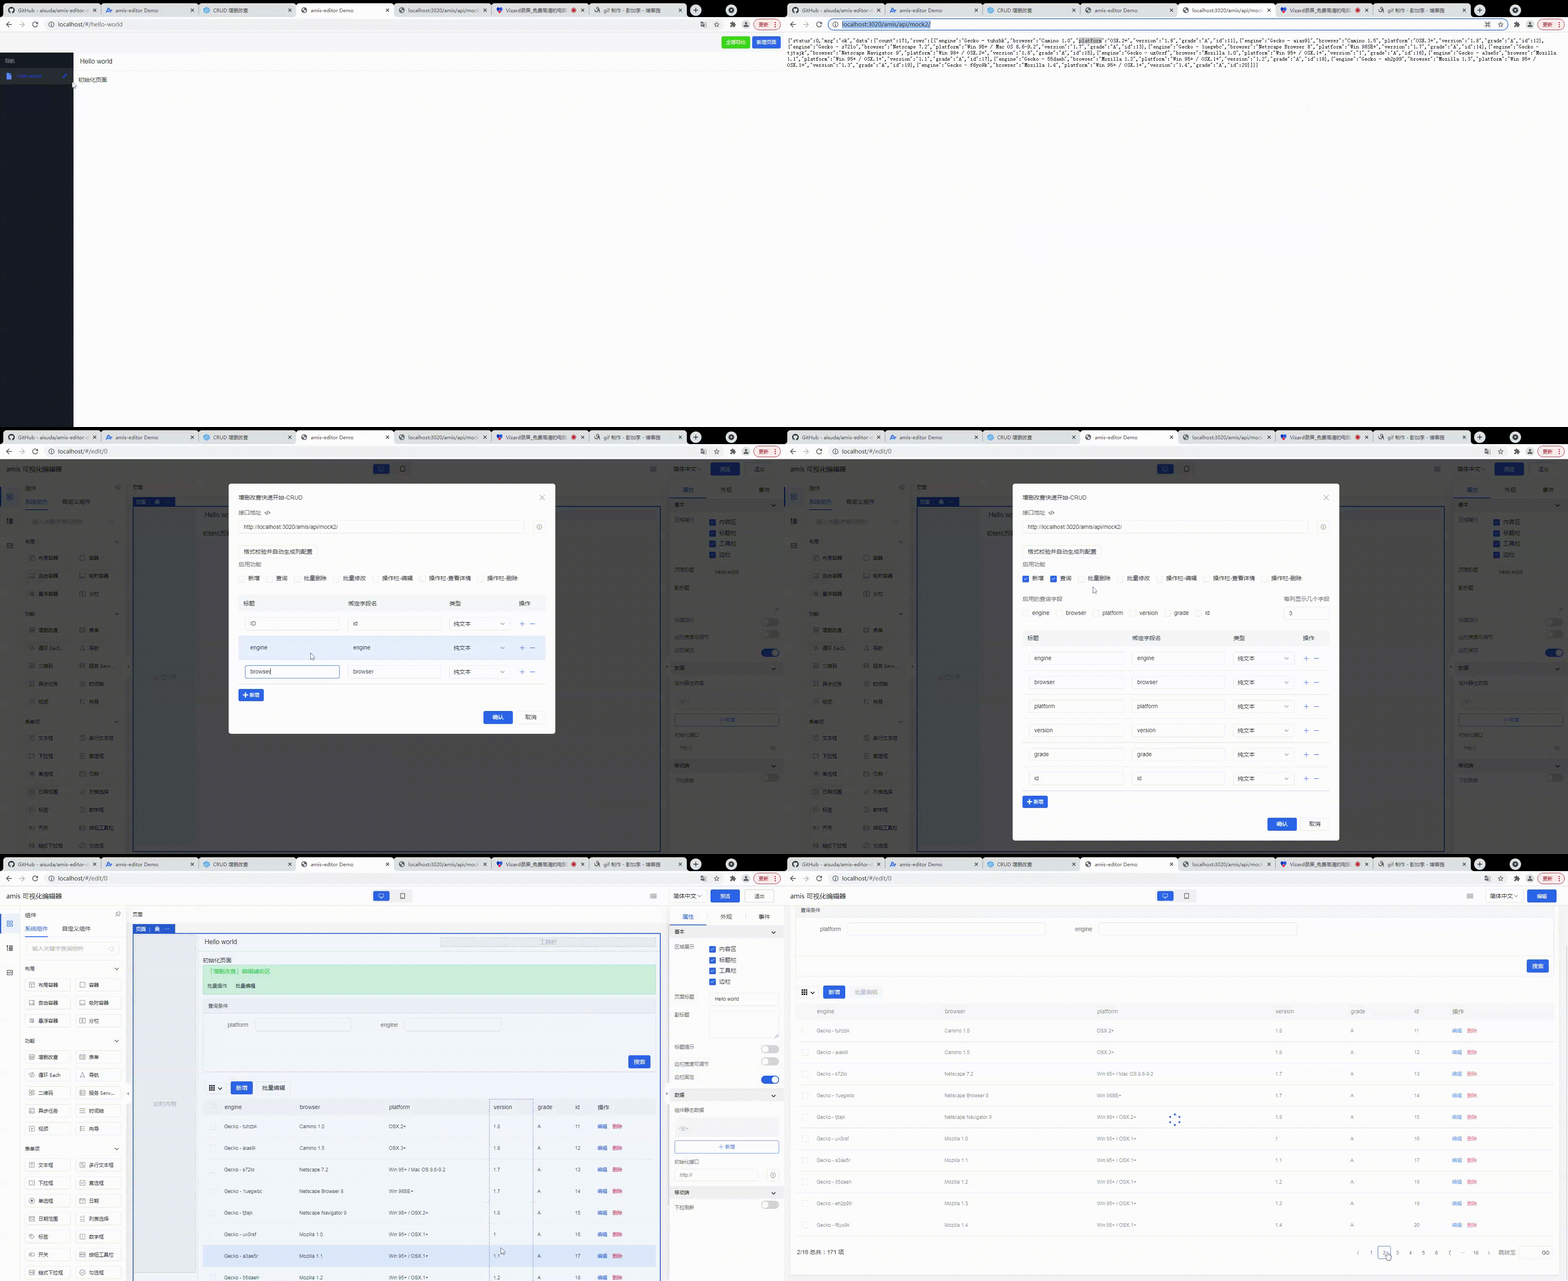
最后生成的配置在这里(也可直接修改):
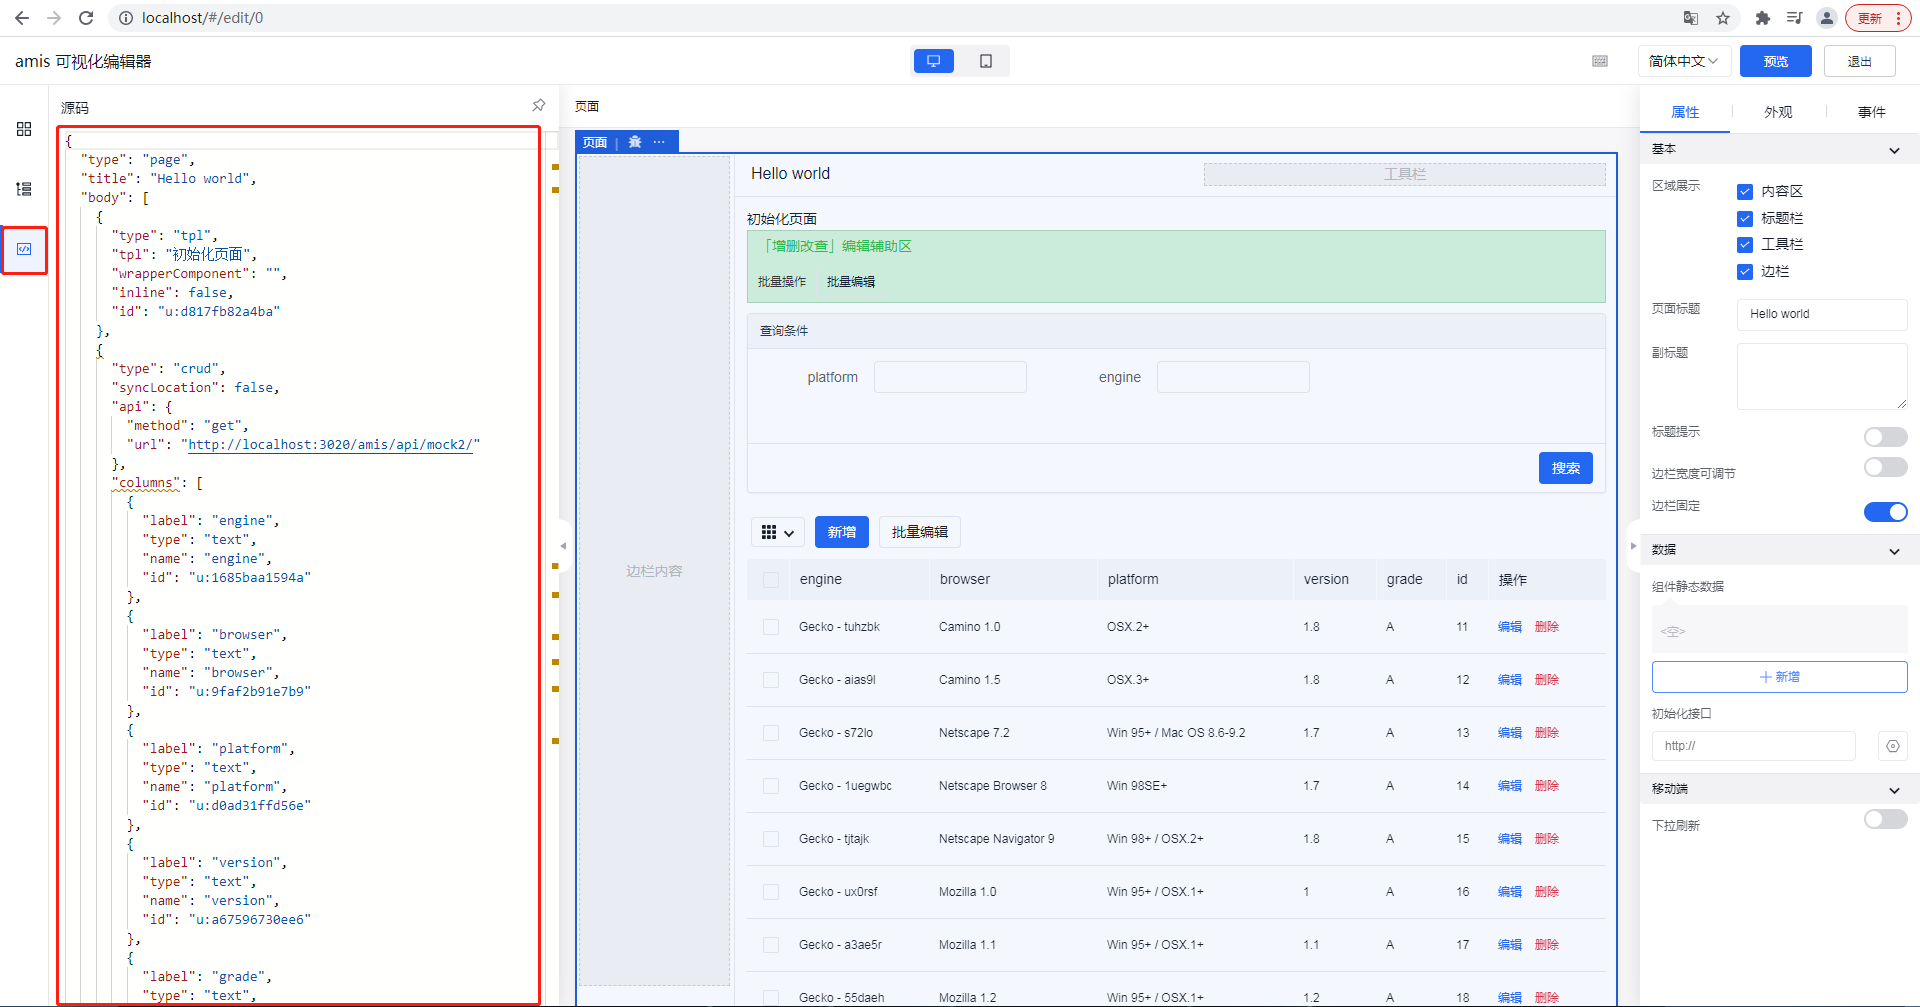
Tip:除了编辑的url需要修改 json,其他的都可以在编辑器右侧中配置。
注:目前笔者将 amis-editor 作为一个单独的项目运行,通过 npm run build 打包,打包后的 html 中出现以 https://aisuda.github.io/amis-editor-demo/demo/ 开头的资源,引入内网是不行的,于是更改 assetsPublicPath: './' 即可指向引入打包出来的资源。目前还是有点小图标没有出来,可能需要更改某些地方。
// amis.config.js build: { entry: { index: './src/index.tsx', editor: './src/mobile.tsx', }, NODE_ENV: 'production', assetsRoot: resolve('./demo'), // 打包后的文件绝对路径(物理路径) // assetsPublicPath: 'https://aisuda.github.io/amis-editor-demo/demo/', // 设置静态资源的引用路径(根域名+路径) assetsPublicPath: './', // 设置静态资源的引用路径(根域名+路径) ... } 中后台集成 amis
引入 amis
下载sdk.tar.gz 解压后把 skd 文件夹放入 spug 的 public 中,然后在单页面中引入。就像这样:
// spug/public.index.html <!-- 引入 amis 的包 > <link rel="stylesheet" href="sdk/sdk.css" /> <link rel="stylesheet" href="sdk/helper.css" /> <link rel="stylesheet" href="sdk/iconfont.css" /> <script src="sdk/sdk.js"></script> ... <title>Spug</title> Tip:amis 还提供了 react 的方式,也就是通过 npm 来使用,但公司分配的机器不太好,构建项目报内存不够(JavaScript heap out of memory),多次尝试(比如:在 linux(node18)中运行、调整内存大小 --max-old-space-size、win7 中安装 node14/16)也未解决,只能选用 sdk 的方式。
新建页面
新建页面 amis A,用于将 amis-editor 的配置 json 渲染出前端页面。相关代码有:
- store.js - 取得 amis-editor 的配置。这里使用 mockjs 模拟,数据就是上文编辑器创建的页面。
// spugsrcpagesamisstore.js import { observable,} from 'mobx'; import http from 'libs/http'; class Store { // 表格数据 @observable config = {}; @observable isFetching = false; fetchRecords = (path) => { http.get(`/api${path}/`) .then(res => { // {type: "page", title: "Hello world", body: Array(2), id: "u:7b55b5793e16", asideResizor: false, …} console.log('res', res) this.config = res; }) .finally(() => this.isFetching = false) }; } export default new Store() - index.js - 根据配置渲染页面,也就是 amis 解析 json:
// spugsrcpagesamisindex.js import React from 'react'; import { observer } from 'mobx-react'; import axios from 'axios'; import store from './store'; import _ from 'lodash'; window.enableAMISDebug = true // amis 环境配置 const env = { theme: 'cxd', // 下面三个接口必须实现 fetcher: ({ url, // 接口地址 method, // 请求方法 get、post、put、delete data, // 请求数据 responseType, config, // 其他配置 headers // 请求头 }) => { config = config || {}; config.withCredentials = true; responseType && (config.responseType = responseType); if (config.cancelExecutor) { config.cancelToken = new (axios).CancelToken( config.cancelExecutor ); } config.headers = headers || {}; if (method !== 'post' && method !== 'put' && method !== 'patch') { if (data) { config.params = data; } return (axios)[method](url, config); } else if (data && data instanceof FormData) { config.headers = config.headers || {}; config.headers['Content-Type'] = 'multipart/form-data'; } else if ( data && typeof data !== 'string' && !(data instanceof Blob) && !(data instanceof ArrayBuffer) ) { data = JSON.stringify(data); config.headers = config.headers || {}; config.headers['Content-Type'] = 'application/json'; } return (axios)[method](url, data, config); }, isCancel: (value) => { console.log('isCancel') }, copy: (content) => { console.log('copy') } }; function updateAmis(...options) { if (!document.getElementById('amisbox')) { return } let amis = window.amisRequire('amis/embed'); let amisScoped = amis.embed('#amisbox', ...options); } @observer class AMISComponent extends React.Component { componentDidMount() { const path = this.props.page // 请求对应页面的配置 store.fetchRecords(path) } render() { // 根据配置文件重新渲染页面 // 注:使用 lodash 的深拷贝不起作用 updateAmis(JSON.parse(JSON.stringify(store.config)), {}, env) return <div id="amisbox"></div> } } class APP extends React.Component { componentWillUnmount() { // 卸载时需要清空,否则切换页面还会显示上个页面 store.config = {}; } render() { return ( <> <AMISComponent page={this.props.location.pathname} /> </> ); } } export default APP; 注:为了让配置变更时 amis 能重新渲染页面,笔者使用了一个 hack 的方式:JSON.parse(JSON.stringify(store.config))。其他方法都不行(curd 存在显示问题):Object.assign(store.config)、_.cloneDeep(store.config)、{...store.config}
Tip: 这段代码参考 react 引入方式的 https://github.com/aisuda/amis-react-starter/blob/main/src/App.tsx。例子中是 typescript 写法,对于暂时不支持 ts 的项目,直接将类型去除即可使用。就像这样:
config.cancelToken = new (axios as any).CancelToken( config.cancelExecutor ); // 去除 ts 的类型 config.cancelToken = new (axios).CancelToken( config.cancelExecutor ); import React from 'react'; import { observer } from 'mobx-react'; import axios from 'axios'; import { render as renderAmis, ToastComponent, AlertComponent } from 'amis'; import store from './store'; import _ from 'lodash'; // amis 环境配置 const env = { theme: 'cxd', // 下面三个接口必须实现 fetcher: ({ url, // 接口地址 method, // 请求方法 get、post、put、delete data, // 请求数据 responseType, config, // 其他配置 headers // 请求头 }) => { console.log('fetcher', method) config = config || {}; config.withCredentials = true; responseType && (config.responseType = responseType); if (config.cancelExecutor) { config.cancelToken = new (axios).CancelToken( config.cancelExecutor ); } config.headers = headers || {}; if (method !== 'post' && method !== 'put' && method !== 'patch') { if (data) { config.params = data; } return (axios)[method](url, config); } else if (data && data instanceof FormData) { config.headers = config.headers || {}; config.headers['Content-Type'] = 'multipart/form-data'; } else if ( data && typeof data !== 'string' && !(data instanceof Blob) && !(data instanceof ArrayBuffer) ) { data = JSON.stringify(data); config.headers = config.headers || {}; config.headers['Content-Type'] = 'application/json'; } return (axios)[method](url, data, config); }, isCancel: (value) => { console.log('isCancel') }, copy: (content) => { console.log('copy') } }; @observer class AMISComponent extends React.Component { componentDidMount() { const path = this.props.page // 请求对应页面的配置 store.fetchRecords(path) } render() { return renderAmis( // store.config, // 使用 _.cloneDeep() 报错 JSON.parse(JSON.stringify(store.config)), { // props... }, env ); } } class APP extends React.Component { componentWillUnmount() { // 卸载时需要清空,否则切换页面还会显示上个页面 store.config = {}; } render() { return ( <> <ToastComponent key="toast" position={'top-right'} /> <AlertComponent key="alert" /> <AMISComponent page={this.props.location.pathname} /> </> ); } } export default APP; 放行 amis 接口
注:spug 中 axios 被封装到 http.js 中,虽然在 amis 中通过 axios 发送请求,还是会走 http.js 中的拦截器(handleResponse)
由于 amis 的数据格式和 spug 的不同,这里暂时约定有 flag:amis 的是 amis 的接口,数据不做处理,直接放行。
// http.js import http from 'axios' ... // response处理 function handleResponse(response) { // 由于 amis 的数据格式和 spug 的不同,这里暂时约定有 flag:amis(例如:{"flag": "amis", "status": 0, "msg": "ok" }) 的是amis 的接口,数据不做处理,直接放行 const isAmis = response.data.flag === 'amis' if(isAmis){ return Promise.resolve(response.data) } Tip:amis 所需的数据格式和 spug 的不同,一种方法是前端来调整。建议让后端返回 amis 所需的数据格式,因为这是 amis 的页面,是新功能。
node 服务
现在spug的服务接口是 3010,修改 node 服务允许其跨域:
var allowCors = function (req, res, next) { // 注:笔者使用 `*` 仍报跨域问题,修改为请求地址(`http://localhost`)即可。 res.header('Access-Control-Allow-Origin', 'http://localhost:3010'); ... next(); }; Tip:使用 yapi(docker 方式安装即可) 非常方便模拟数据,也无需处理跨域。
效果
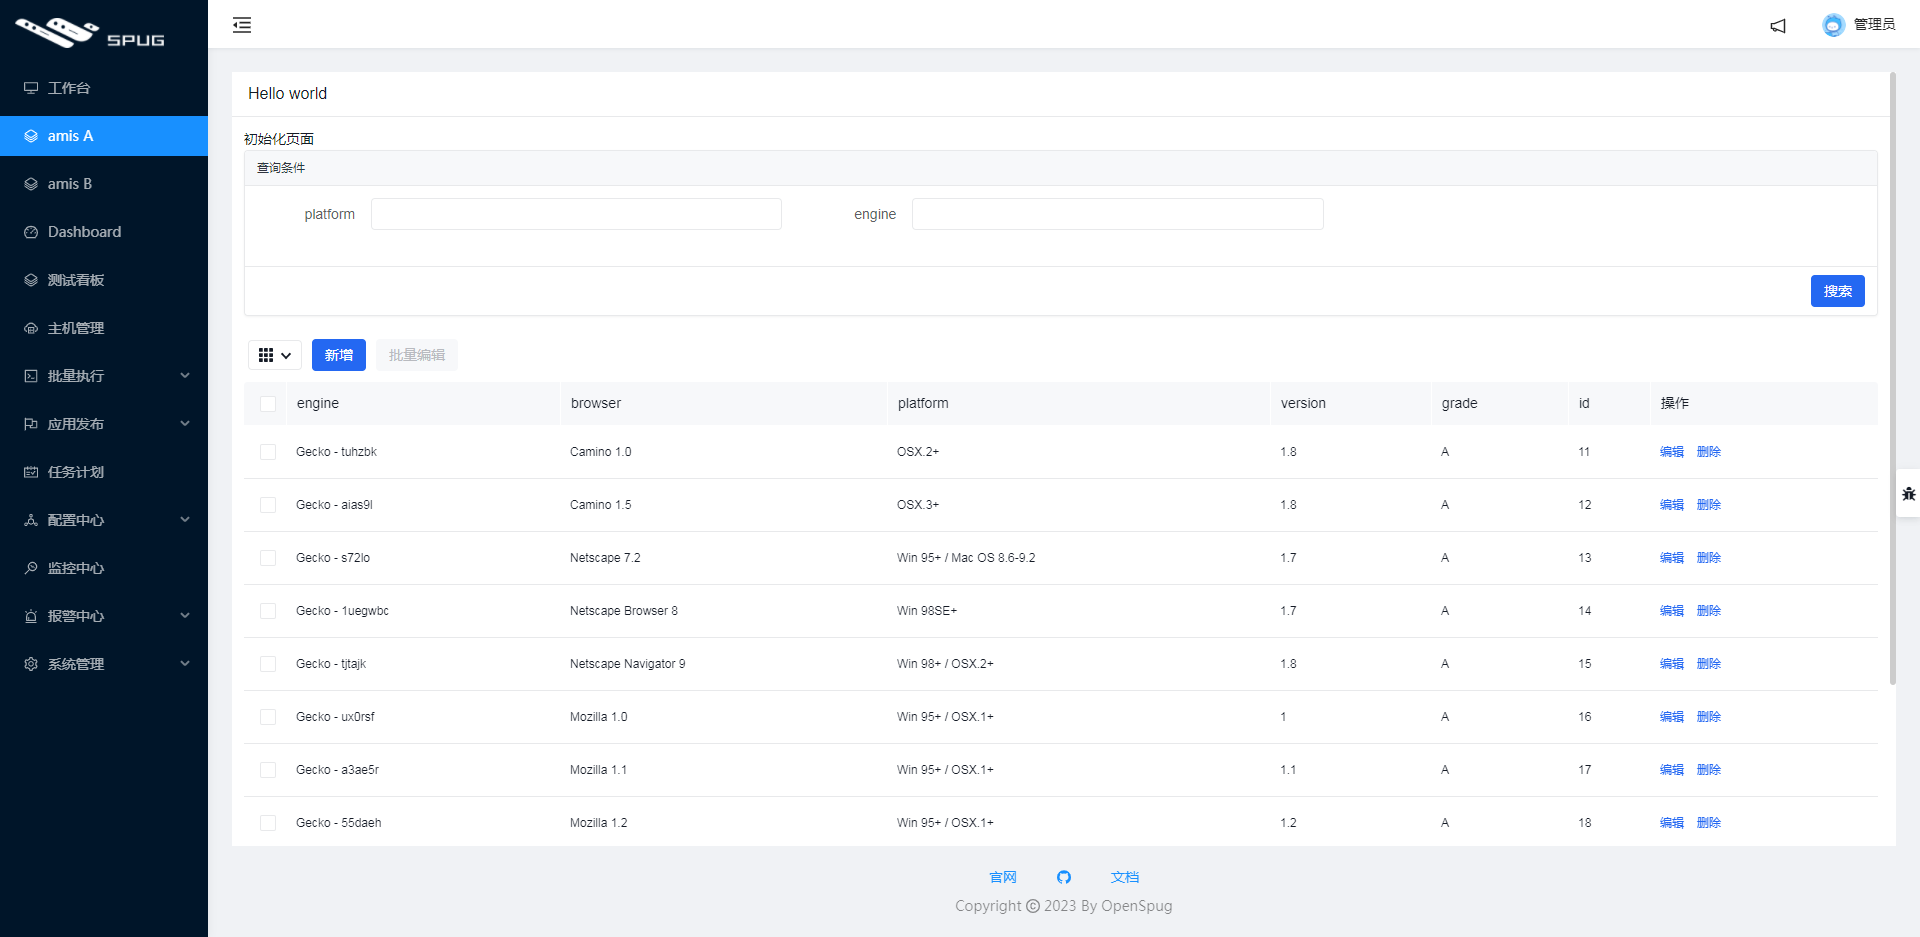
amis-editor 集成到 spug 的效果如下:
自定义组件
amis-editor 也提供了自定义组件,笔者参考自定义组件-a新建一个自定义组件-b:
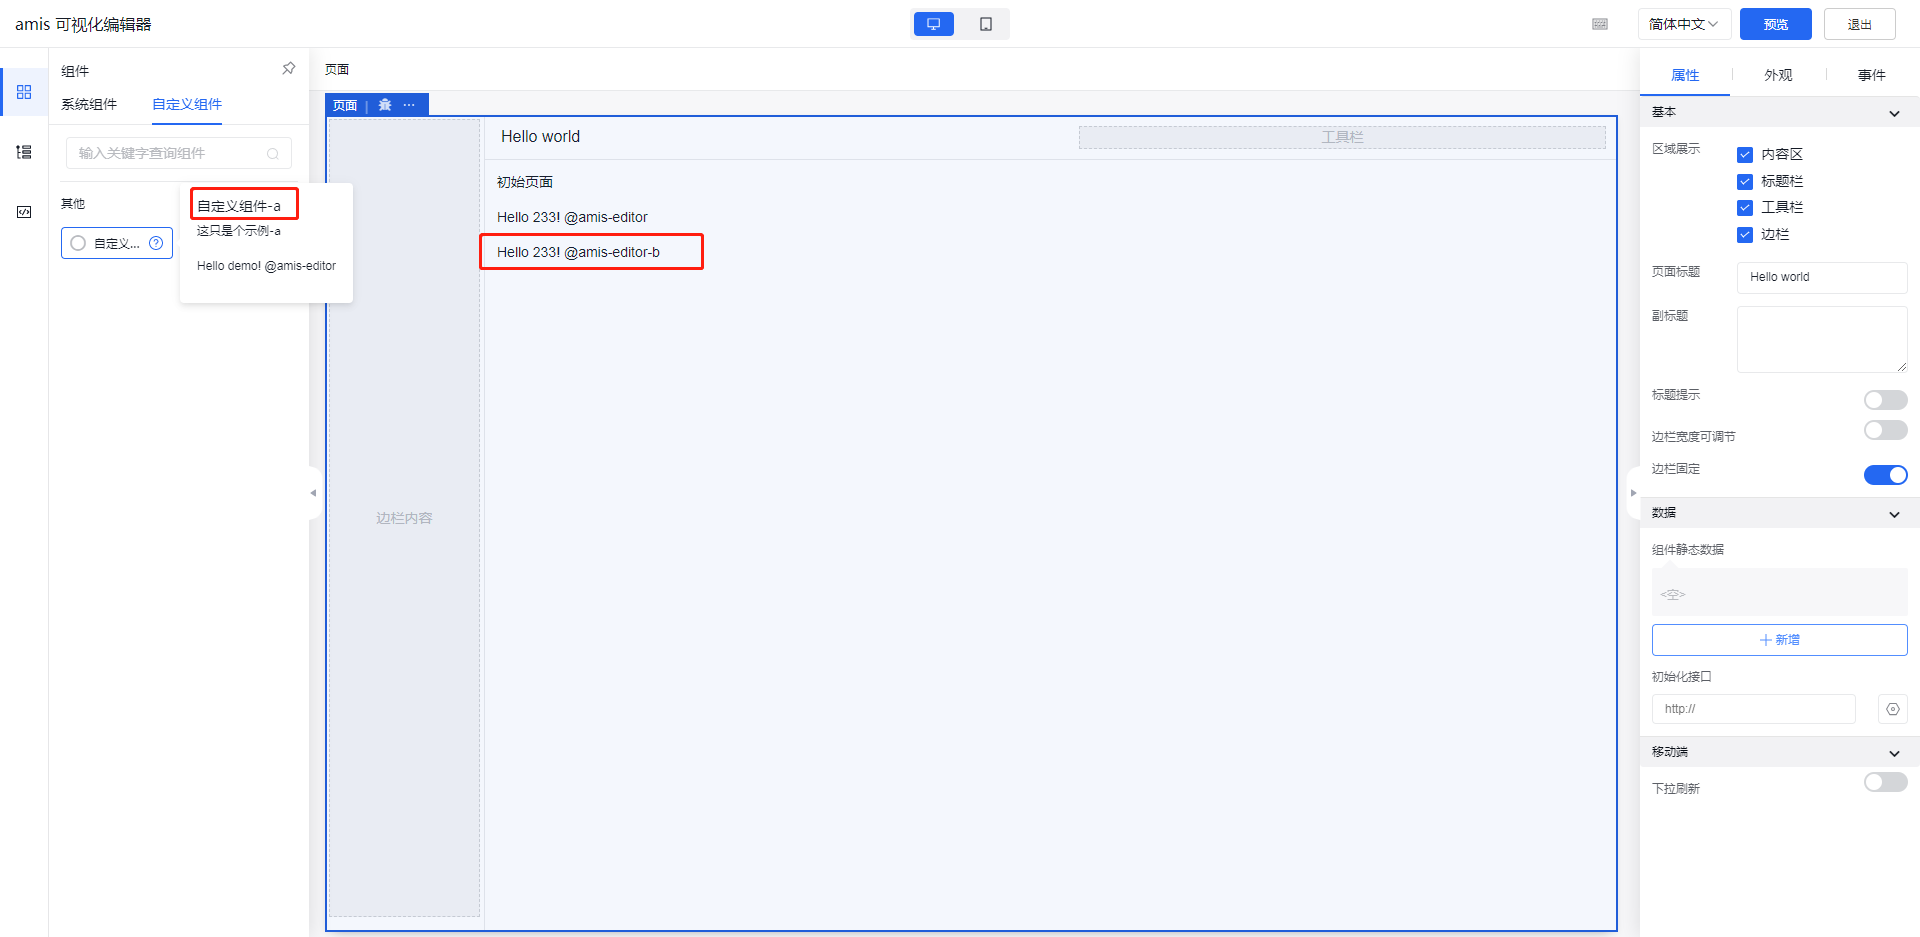
实现很简单,就是复制一份以下文件:
- ./renderer/MyRenderer.tsx - ./editor/MyRenderer.tsx spug 中的 amis 集成该自定义组件。可以这样做:
// 自定义组件,props 中可以拿到配置中的所有参数,比如 props.label 是 'Name' function CustomComponent(props) { const { target } = props; let dom = React.useRef(null); React.useEffect(function () { // 从这里开始写自定义代码,dom.current 就是新创建的 dom 节点 // 可以基于这个 dom 节点对接任意 JavaScript 框架,比如 jQuery/Vue 等 dom.current.innerHTML = `<p>Hello {target}! @amis-editor</p>` // 而 props 中能拿到这个 }); return React.createElement('div', { ref: dom }); } 方案总结
中台系统 + amis + amis-editor 此方案能通过可视化的配置实现前端页面的开发,实现所见即所得的效果。
对于常用的页面只需要通过可视化配置界面就能完成前端开发。
其他章节请看:


