- A+
这里给大家分享我在网上总结出来的一些知识,希望对大家有所帮助
按需导入的配置文件
配置文件这里就不再赘述,内容都是一样的,主打一个随用随取,按需导入。
import * as echarts from "echarts/core"; // 引入用到的图表 import { LineChart, type LineSeriesOption} from "echarts/charts"; // 引入提示框、数据集等组件 import { TitleComponent, TooltipComponent, GridComponent, LegendComponent, type TooltipComponentOption, type TitleComponentOption, type GridComponentOption, type LegendComponentOption } from "echarts/components"; // 引入标签自动布局、全局过渡动画等特性 import { LabelLayout } from "echarts/features"; // 引入 Canvas 渲染器,必须 import { CanvasRenderer } from "echarts/renderers"; import type { ComposeOption } from "echarts/core"; // 通过 ComposeOption 来组合出一个只有必须组件和图表的 Option 类型 export type ECOption = ComposeOption< | LineSeriesOption | GridComponentOption | TitleComponentOption | TooltipComponentOption | LegendComponentOption >; // 注册必须的组件 echarts.use([ LineChart, TitleComponent, TooltipComponent, GridComponent, CanvasRenderer, LabelLayout, LegendComponent ]); export default echarts;
基本封装
DOM结构和实例化
<script setup lang="ts"> import { Ref, onMounted, onBeforeUnmount } from "vue"; import { type EChartsType } from "echarts/core"; interface Props { option: ECOption; theme?: Object | string; // 主题 } const props = withDefaults(defineProps<Props>(), { theme: null }); const chartRef = ref<Ref<HTMLDivElement>>(null); const chartInstance = ref<EChartsType>(); // 绘制 const draw = () => { if (chartInstance.value) { chartInstance.value.setOption(props.option, { notMerge: true }); } }; // 初始化 const init = () => { if (!chartRef.value) return; // 校验 Dom 节点上是否已经挂载了 ECharts 实例,只有未挂载时才初始化 chartInstance.value = echarts.getInstanceByDom(chartRef.value); if (!chartInstance.value) { chartInstance.value = echarts.init( chartRef.value, props.theme, { renderer: "canvas" } ); draw(); } }; watch(props, () => { draw(); }); onMounted(() => { init(); }); onBeforeUnmount(() => { // 容器被销毁之后,销毁实例,避免内存泄漏 chartInstance.value?.dispose(); }); </script> <template> <div id="echart" ref="chartRef" :style="{ width: '100px', height: '120px' }" /> </template>
chartRef:当前的 DOM 节点,即 ECharts 的容器;
chartInstance:当前 DOM 节点挂载的 ECharts 实例,可用于调用实例上的方法,注册事件,自适应等;
draw:用于绘制 ECharts 图表,本质是调用实例的 setOption 方法;
init:初始化,在此获取 DOM 节点,挂载实例,注册事件,并调用 draw 绘制图表。
Cannot read properties of undefined (reading 'type')
请注意,上述代码目前还不能正常运行,这里会遇到第一个坑 —— 图表无法显示,这是 React 中没有碰到的:
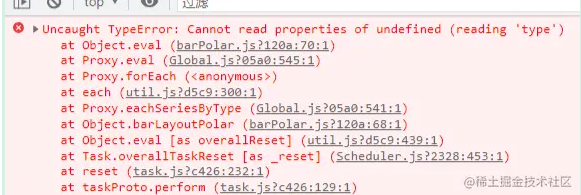
出现这种问题是因为,我们使用 ref 接收了 echarts.init 的实例。这会导致 chartInstance 被代理成为响应式对象,影响了 ECharts 对内部属性的访问。Echarts 官方 FAQ 也阐述了该问题:

所以,我们有两种解决方法:
- 使用
shallowRef替换ref; - 使用
ref+markRaw。
shallowRef 和 ref() 不同之处在于,浅层 ref 的内部值将会原样存储和暴露,并且不会被深层递归地转为响应式。只有对 .value 的访问是响应式的。
而 markRaw 则会将一个对象标记为不可被转为代理。返回该对象本身。在有些值不应该是响应式的场景中,例如复杂的第三方类实例或 Vue 组件对象,这很有用。
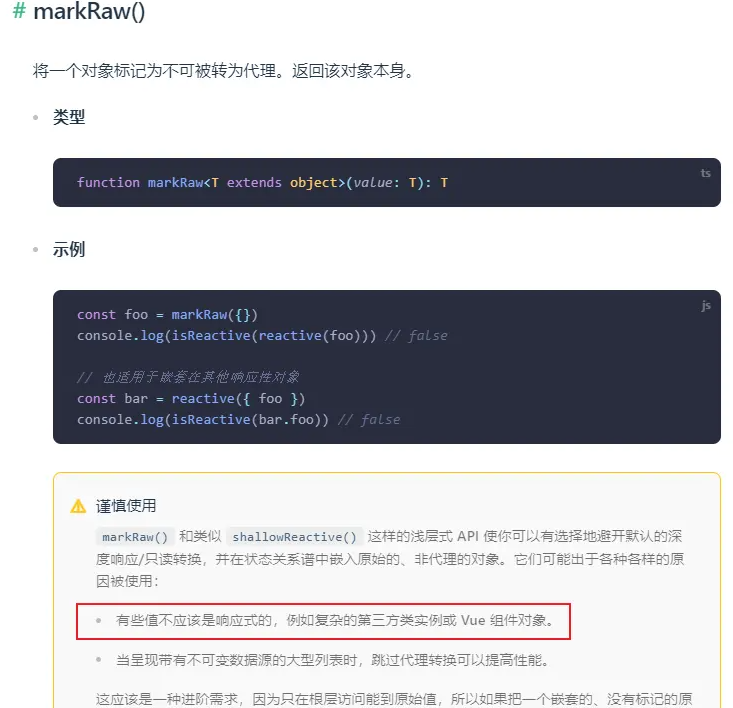
我们这里使用 markRaw 对 init 进行包裹:
chartInstance.value = markRaw( echarts.init( chartRef.value, props.theme, { renderer: "canvas" } ) );
窗口防抖自适应
这里和 React 中就差不多了,主要安利一个 Vue 官方团队维护的 hooks 库:vueuse 。和 React 中的 ahooks 一样,封装了很多实用的 hooks,我们可以使用 useDebounceFn 来优化自适应函数:
import { useDebounceFn } from "@vueuse/core"; // 窗口自适应并开启过渡动画 const resize = () => { if (chartInstance.value) { chartInstance.value.resize({ animation: { duration: 300 } }); } }; // 自适应防抖优化 const debouncedResize = useDebounceFn(resize, 500, { maxWait: 800 }); onMounted(() => { window.addEventListener("resize", debouncedResize); }); onBeforeUnmount(() => { window.removeEventListener("resize", debouncedResize); });
额外监听宽高
目前,图标的大小还是写死的,现在我们支持 props 传递宽高来自定义图表大小:
interface Props { option: ECOption; theme?: Object | string; width: string; height: string; } <template> <div id="echart" ref="chartRef" :style="{ width: props.width, height: props.height }" /> </template>
请注意:在使用时,我们必须指定容器的宽高,否则无法显示,因为图表在绘制时会自动获取父容器的宽高。
flex/grid 布局下 resize 失效的问题
这个问题刚遇到着实有点蛋疼,摸了蛮久,而 bug 触发的条件也比较奇葩,但也比较常见:
- 在父组件中,复用多个 ECharts 组件;
- 使用了 flex 或 grid 这种没有明确给定宽高的布局;
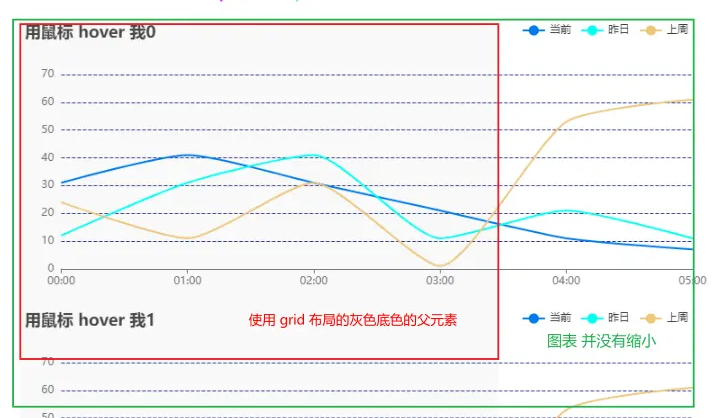
此时会发现:当前窗口放大,正常触发 resize, 图表会随之放大。但是,此时再缩小窗口,虽然也会触发 resize,但是图表的大小却缩不回来了......
一开始还以为是我封装的写法有问题,直到搜到了ECharts 官方的 issues 才发现原来不止我一个遇到了?
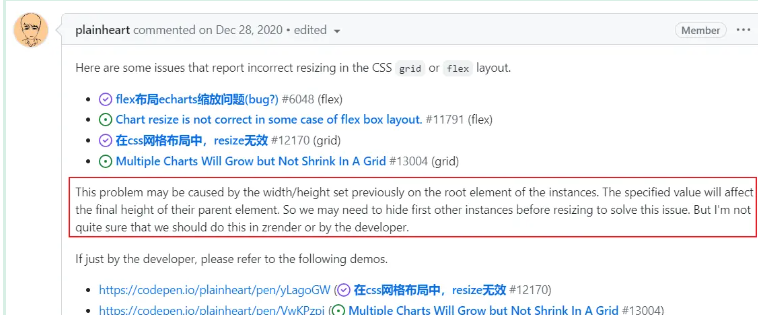
我的理解是:首先,无论什么布局 echarts 取的都是 dom 的 clientWidth 和 clientHeight 作为容器宽高。其次,由于 flex、grid 这种布局可以不需要显示地指定 width、height,这就导致 echarts 在自适应的过程中无法明确地获取到容器的宽高,所以即便触发了 resize 事件,但是重绘的图表还是之前默认的宽高。
解决方案
给每个 flex-item 或 grid-item 自适应的宽或者高都设置一个最小值(我项目中的宽是自适应的,高度是固定的):
.chart-item { flex: 1; min-width: 30vh; height: 300px; }
这里不得不吐槽下,早在2017年就有人提出过这个问题,2020年终于给出了解释,但是现在都2023了,这个问题还没有得到解决,issues 还 open 着 ☹️
绑定鼠标事件
我们可以给图表中的一些组件添加额外的交互,比如给 title 鼠标 hover 事件等,记得在需要使用事件的组件上添加 triggerEvent: true 属性。
我们演示鼠标移入 title 显示 y轴 name,鼠标移出 title 隐藏 y轴 name 的需求:
interface Props { // 略... onMouseover?: (...args: any[]) => any; onMouseout?: (...args: any[]) => any; } const init = () => { // 略...... // 绑定 mousehover 事件: if (props.onMouseover) { chartInstance.value.on("mouseover", (event: Object) => { props.onMouseover(event, chartInstance.value, props.option); }); } // 绑定 mouseout 事件: if (props.onMouseout) { chartInstance.value.on("mouseout", (event: Object) => { props.onMouseout(event, chartInstance.value, props.option); }); } } };
在上述注册的回调事件中,我们将 ECharts 实例和传入的 option 重新传出去,这样可以就在外面重新配置 option 并调用实例的方法进行图表的重绘了:
import Chart from "@/components/BaseChart/index.vue"; import type { EChartsType } from "echarts/core"; import type { ECOption } from "@/components/BaseChart/config"; import type { YAXisOption } from "echarts/types/dist/shared"; // 鼠标移入,显示y轴 name const onMouseover = (chart: EChartsType, option: ECOption) => { (option.yAxis as YAXisOption).nameTextStyle.color = "#ccc"; // 重绘图表 chart.setOption(option); }; // 鼠标移出,隐藏y轴 name const onMouseout = (chart: EChartsType, option: ECOption) => { (option.yAxis as YAXisOption).nameTextStyle.color = "transparent"; chart.setOption(option); }; <template> <Chart width="100%" height="305px" :option="{ // 略...... title: { text: "标题", triggerEvent: true }, }" :on-mouseover="onMouseover" :on-mouseout="onMouseout" /> </template>
展示 loading 动画
支持受控的 loading 动画
interface Props { // 略... loading?: boolean; // 受控 } const props = withDefaults(defineProps<Props>(), { theme: null, loading: false }); watch( () => props.loading, loading => { loading ? chartInstance.value.showLoading() : chartInstance.value.hideLoading(); } );
暴露实例方法
对父组件暴露获取 ECharts 实例的方法,让父组件可直接通过实例调用原生函数。
defineExpose({ getInstance: () => chartInstance.value, resize, draw });
顺便提一下, defineExpose 是在 <script setup> 才能使用的编译器宏,用来显式指定需要暴露给父组件的属性。
完整代码
太长了,贴出来没人会细看,有需要的直接自取,亲测有效,启动项目就能看到,快去魔改吧 ☞github

