- A+
所属分类:Web前端
模板页的重要性
Vue 项目中使用布局组件来创建页面布局的方式是完全可行的,而且在很多项目中都被广泛采用,包括像 ruoyi 这样的框架。这种模式有助于实现统一的页面布局结构,减少重复代码,并提高代码的可维护性。
让我们具体分析一下你提到的 ruoyi 框架的做法:
-
Layout 组件:
layout/index.vue是一个布局组件,定义了整个页面的结构,包括头部、侧边栏、底部等。在这个组件中,通过使用插槽来容纳具体页面的内容,就像我在之前的回答中展示的那样。 -
Router 配置: 在
router/index.js中,为每个页面配置了component: Layout,这意味着每个路由都会使用Layout组件作为布局,然后根据具体的路由再将对应的页面组件插入到布局中的插槽中。
这种设计模式的好处包括:
- 代码复用: 布局逻辑只需要编写一次,然后在各个页面中重复使用。
- 维护性: 如果需要调整整体布局,只需要修改一处即可影响所有页面。
- 扩展性: 可以轻松添加全局功能,例如导航、侧边栏等,而不必在每个页面都添加相同的代码。
- 灵活性: 如果某个页面需要不同的布局,也可以在路由配置中指定其他组件作为布局。
总的来说,这种模式是一种很好的实践,可以提高开发效率和代码质量。当然,具体实现还需要根据项目需求进行调整和扩展。
具体实现
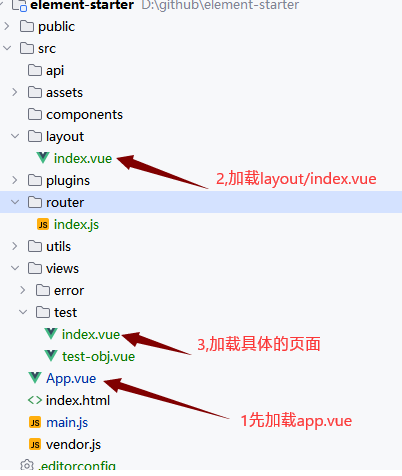
- 项目结构和加载顺序

- 定义App.vue入口内容
<template> <div id="app"> <h1>app.vue入口内容</h1> <router-view/> </div> </template> <script> export default { name: "App" }; </script> - 定义layout/index.vue的模板内容,你可以在里面定义其它子组件,不要忘记添加router-view,以便加载真实页面的内容
<template> <div id="app"> <h1>模板页加载</h1> <router-view/> </div> </template> <script> export default { name: 'Layout', components: {}, methods: {} } </script> - 定义router.js,配置页面的路由,定义页面的模板页
import Vue from 'vue' import Router from 'vue-router' Vue.use(Router) /* Layout */ import Layout from '@/layout' /** * Note: 路由配置项 * * hidden: true // 当设置 true 的时候该路由不会再侧边栏出现 如401,login等页面,或者如一些编辑页面/edit/1 * alwaysShow: true // 当你一个路由下面的 children 声明的路由大于1个时,自动会变成嵌套的模式--如组件页面 * // 只有一个时,会将那个子路由当做根路由显示在侧边栏--如引导页面 * // 若你想不管路由下面的 children 声明的个数都显示你的根路由 * // 你可以设置 alwaysShow: true,这样它就会忽略之前定义的规则,一直显示根路由 * redirect: noRedirect // 当设置 noRedirect 的时候该路由在面包屑导航中不可被点击 * name:'router-name' // 设定路由的名字,一定要填写不然使用<keep-alive>时会出现各种问题 * query: '{"id": 1, "name": "ry"}' // 访问路由的默认传递参数 * roles: ['admin', 'common'] // 访问路由的角色权限 * permissions: ['a:a:a', 'b:b:b'] // 访问路由的菜单权限 * meta : { noCache: true // 如果设置为true,则不会被 <keep-alive> 缓存(默认 false) title: 'title' // 设置该路由在侧边栏和面包屑中展示的名字 icon: 'svg-name' // 设置该路由的图标,对应路径src/assets/icons/svg breadcrumb: false // 如果设置为false,则不会在breadcrumb面包屑中显示 activeMenu: '/system/user' // 当路由设置了该属性,则会高亮相对应的侧边栏。 } */ // 公共路由 export const constantRoutes = [ { path: '/404', component: () => import('@/views/error/404'), hidden: true }, { path: '/401', component: () => import('@/views/error/401'), hidden: true }, { path: '/test', component: Layout, hidden: true, children: [ { path: 'index', component: () => import('@/views/test/index'), name: 'test', meta: { title: 'test首页', icon: 'dashboard', affix: true } }, { path: 'test-obj', component: () => import('@/views/test/test-obj'), name: 'test-obj', meta: { title: 'test测试对象', icon: 'dashboard', affix: true } } ] } ] // 防止连续点击多次路由报错 let routerPush = Router.prototype.push; let routerReplace = Router.prototype.replace; // push Router.prototype.push = function push(location) { return routerPush.call(this, location).catch(err => err) } // replace Router.prototype.replace = function push(location) { return routerReplace.call(this, location).catch(err => err) } export default new Router({ mode: 'history', // 去掉url中的# scrollBehavior: () => ({ y: 0 }), routes: constantRoutes }) - 运行/test/test-obj的效果,它会继承app.vue和layout/index.vue的内容


