- A+
所属分类:Web前端
这里给大家分享我在网上总结出来的一些知识,希望对大家有所帮助
前言
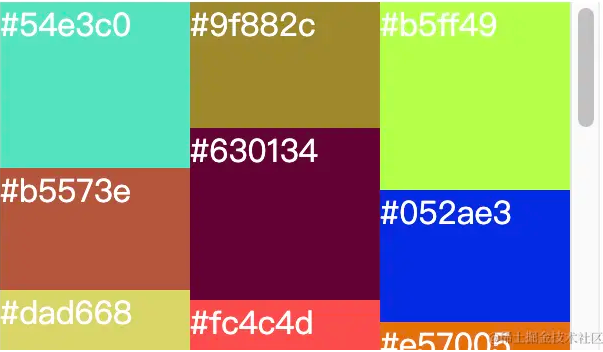
在学习Grid布局之时,我发现其是CSS中的一种强大的布局方案,它将网页划分成一个个网格,可以任意组合不同的网格,做出各种各样的布局,在刷某书和某宝首页时,我们发现其展示方式就是一种瀑布流,是一种流行的网站页面布局,视觉表现为参差不齐的多栏布局,随着页面向下滚动,这种布局会不断加载数据块并附加到当前尾部。采用瀑布流布局的方式可以打破常规网站布局排版,给用户眼前一亮的新鲜感,更好的适应移动端。
因此结合二者,本文将通过grid布局简单实现一个瀑布流组件,该组件已开源上传npm,可以直接安装使用,Git地址在文尾。
实现效果:

实现原理
1、使用grid布局将页面分为无数个小网格,每个网格高度为1px。
.grid-content { display: grid; grid-auto-rows: minmax(1px, 1px); overflow: auto; }
2、宽度根据需要自定义的列数自动分配。
'grid-template-columns': `repeat(${props.columns}, 1fr)`,
3、根据每个卡片窗口的高度计算每个卡片需要跨越几个网格(因为每个网格设置高为1px,所以高度就是需要跨越的网格数)
'grid-row-end': `span ${gridItem.value.clientHeight - 1}`
4、监听瀑布流滚动事件,通过判断滚动条距离底部的高度,在滚动到底部一定距离时加载更多的数据,以实现无限滚动。
主要代码实现
gridContent 组件主要代码,循环展示每个条目,根据自定义的列展示不同的列数量,根据触底数据判断获取最新数据。监听传入的数据进行处理,目前只是做了简单处理,后面将通过虚拟列表的形式,动态处理该数据,以增加性能。
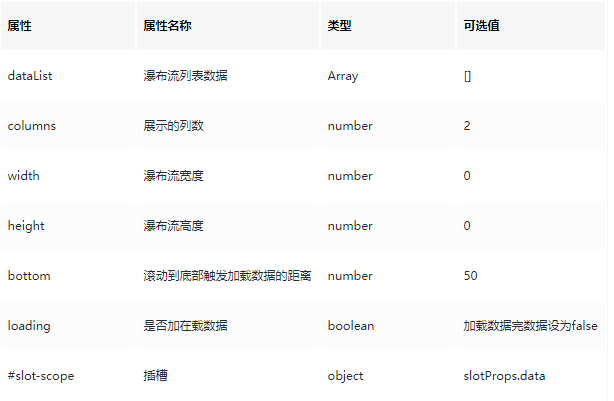
<template> <div class="grid-content" ref="gridContent" :style="gridStyle" @scroll="getMoreData"> <grid-item v-for="item in showDataList" :key="item.dataIndex" :data="item"> <template #slot-scope="slotProps"> <slot name="slot-scope" :slotProps="slotProps"></slot> </template> </grid-item> </div> </template> <script lang="ts" setup> import GridItem from './gridItem.vue'; import { ref, watch } from 'vue'; const props = defineProps({ dataList: { type: Array, default: [] }, columns: { type: Number, default: 2 }, width: { type: Number, default: 300 }, height: { type: Number, default: 400 }, bottom:{ type: Number, default: 50 }, loading:{ type: Boolean, default: true } }) const emit=defineEmits(['getMoreData']); const gridStyle = ref({}); const showDataList = ref<any>([]) watch(() => props.dataList, (newValue) => { let tempData: any = []; newValue.forEach((item: any, index) => { tempData.push({ ...item, dataIndex: index }) }) showDataList.value = tempData; gridStyle.value = { 'grid-template-columns': `repeat(${props.columns}, 1fr)`, width:props.width + 'px', height:props.height + 'px' } }, { immediate: true,deep:true }) const isLoading=ref<boolean>(false); watch(()=>props.loading,(newValue:boolean)=>{ isLoading.value=newValue; }) const gridContent=ref<any>(null); //根据触底数据判断获取最新数据 const getMoreData=()=>{ const scrollHeight = gridContent.value.scrollHeight || 0; const clientHeight = gridContent.value.clientHeight || 0; const scrollTop = gridContent.value.scrollTop || 0; if(scrollHeight - clientHeight - scrollTop < props.bottom && !isLoading.value){ isLoading.value=true; emit('getMoreData'); } } </script>
grid-item 组件代码,主要通过获取组件高度设置跨越的网格数,通过插槽展示每个卡片。
<template> <div class="grid-item" :style="itemStyle"> <div ref="gridItem"> <slot name="slot-scope" :data="data"></slot> </div> </div> </template> <script lang="ts" setup> import { ref, onMounted } from 'vue'; defineProps({ data: { type: Object, default: () => { } } }) const gridItem = ref<any>(null); const itemStyle = ref({}) onMounted(() => { itemStyle.value = { 'grid-row-end': `span ${gridItem.value.clientHeight - 1}` } }) </script> <style scoped> .grid-item { grid-row-end: span 100; } </style>
使用示例
npm install @fcli/vue-grid-waterfall --save-dev 来安装 在项目中使用 import VueGridWaterfall from '@fcli/vue-grid-waterfall'; const app=createApp(App) app.use(VueGridWaterfall);
使用示例:
<template> <div class="content"> <vue-grid-waterfall :data-list="dataList" :columns="3" @getMoreData="getMoreData" :loading="isLoading"> <template #slot-scope="{ slotProps }"> <div class="item" :style="{ height: slotProps.data.height, background: slotProps.data.color }">{{ slotProps.data.color }}</div> </template> </vue-grid-waterfall> </div> </template> <script setup lang="ts"> import vueGridWaterfall from './plugin/index.vue'; import { ref, onMounted } from 'vue' component: { vueGridWaterfall } const dataList = ref<any>([]); //获取随机颜色 const getRandomColor = () => { const getColor: any = (color: any) => { return (color += '0123456789abcdef'[Math.floor(Math.random() * 16)]) && (color.length == 6) ? color : getColor(color); }; return '#' + getColor('') } const getMoreData = () => { isLoading.value = true; getData() } const isLoading = ref(true); //获取数据 const getData = () => { for (let i = 0; i < 100; i++) { dataList.value.push({ height: 50 + Math.random() * 50 + 'px', color: getRandomColor() }) } setTimeout(()=>{ isLoading.value = false; }) } onMounted(() => { getData() }) </script>


